
Ramsay and Sons (Forfar) Ltd
Established as a limited company in 1946, we have been producing high quality ladders and access solutions from our head office and manufacturing facilities in Forfar, Scotland for over 75 years.
We are a family-run business split into two divisions, Ramsay Ladders and Ramsay Access, allowing us to provide ladders and access solutions for a variety of sectors within the commercial and residential markets.
Although renowned worldwide for our original Loft Ladder, our product range at Ramsay Ladders is as diverse as the purposes for which they are used for. Regardless of its purpose or the environment in which it is to be used, every product is designed with the latest innovations and manufactured to a standard that few companies can match.
Our vast range of standard products include:
- Ladders
- Step Ladders
- Loft Ladders
- Platforms
- Football Goal Frames
Should our standard range of products not meet your requirements, our fabrication division, Ramsay Access, will design & manufacture to your exact specification. Backed by years of experience, we are one of the UK's leading designers & fabricators of special access products.
-
8 Expert Loft Ladder Safety Tips
3 April 2023Loft ladders are incredibly useful pieces of equipment. However, they should be treated with care. If you use them incorrectly or install them in the wrong manner, then you risk hurting yourself quite seriously.
So, to help ensure you avoid any such hazards, here are our 8 top loft ladder safety tips.1. Maintain 3 points of contact
Always ensure you have 3 points of contact with the ladder at all times as you ascend and descend. This could be 2 legs and one hand or vice versa. If you need to carry stuff up, then it’s best to seek out help.
2. Ensure your loft hatch is large enough
Think carefully about how large the items are that you will need to be putting up in your loft. If the hatch isn't big enough, then it will pose a dangerous threat to you as you try to squeeze everything up and through.
3. Never carry too much
If you have a lot of items that need to go into your loft, then take them all in small amounts. Trying to lift up too much at once puts you at greater risk of losing your balance and falling.
4. Always ask for help
Regardless of how much you need to take up, its best to have someone stand at the base of the ladder and see you up and down. Similarly, if an accident did occur, then they will be there to help you right away.
5. Keep any young children and pets away
It can be a real hazard if there are small children or pets running around the base of the ladder. As they may then get in the way or start trying to climb up as well.
6. Don’t reach too far
Ensure that whenever you are placing items into the loft, you are not having to overextend yourself by lifting them overhead. This will cause you to lose balance and risk falling or dropping the items onto yourself.
7. Wear sensible footwear
It is important you always wear some form of sensible footwear with grip whenever using a loft ladder. This means no socks, no flip flops and no shoes with hard, flat soles.
8. Inspect regularly
Finally, to ensure your loft ladder is safe to use, it is important you take the time to give it a regular inspection. If it doesn't get used very much then this might be every 6 months. If it is used regularly, then make your checks more often.
By following these 8 crucial loft ladder safety tips, you should hopefully never have any issues accessing your loft storage space. In general, it is just about being sensible and respecting the possible risks you could face.
-
5 Diy Ladder Tips For Springtime Jobs
3 April 2023Spring has finally sprung, so now is a good time to start planning those odd jobs around the house. But whether it’s cleaning the windows or painting soffits, one thing most springtime jobs require is the use of a ladder. So we thought it would be a good idea to go over a few basic ladder safety tips one more time because when it comes to using ladders you can never be too careful
Tip 1, Make sure your ladder is safe before use
It may seem silly, but just like a pilot, you should carry out pre-flight checks on your equipment before you use it. This is particularly important the first time you use your ladders each season. You need to specifically check for damage to the joints, feet, rungs, stiles and locking mechanism. Most ladders get stored in the shed or garage over the winter months where they are subject to damage. If you have wooden ladders pay particular attention to the rungs and styles which can become loose after prolonged temperature changes throughout the winter.
Tip 2, Remember the Three-point rule
Regardless of what task you are using your ladder for, you should remember the three-point rule. ALWAYS maintain three points of contact with the ladder at all times. This means two feet and one hand, so no holding a paintbrush in one hand and a bucket in the other. Most ladder accidents happen because the three-point rule is broken. So don’t risk losing your footing and use bucket hooks and tool belts to keep your equipment to hand while keeping your hands free.
Tip 3, Be wary of ladders near electricity
If you’re doing any work that involves electrical wiring, such as fitting an extractor fan, removing interior lighting or installing an outside light, you should avoid using aluminium ladders and use fibreglass ladders instead. Fibreglass ladders don’t conduct electricity which makes them much safer to use than aluminium ladders for electrical installations. Also messing with electricity is dangerous, so you should always leave electrical jobs to a qualified electrician if you’re not sure what you’re doing.
Tip 4, Always use the correct ladder for the job
When carrying out DIY tasks it is vital that you always choose the correct ladder for the job. So if you’re doing interior decorating, you should always use a step ladder or combination ladder, because these are much safer than standing on a box or chair. Similarly, if you’re cleaning out the guttering you should only use extension ladders that have the required reach. Never be tempted to use a ladder that is too short for the job. This is a recipe for disaster and will most likely result in serious injury if you fall due to overreaching.
Tip 5, Never use ladders on uneven ground
Lastly, always make sure the ground is even before you attempt to set up your ladders. Any sort of slope will result in the ladder becoming unstable when you are stood at the top of it. The same precaution should be taken when ladders are used on grass, which may look even, but if the grass is wet it can cause your ladder to slip. In such cases consider using a ladder mat, or leveller, to keep the feet of your ladder firmly secured on a level plane.
Ladder safety is paramount, more people are seriously injured or killed using ladders than any other type of DIY equipment. Last year in the UK there were an estimated 43,000 non-fatal accidents that required hospital treatment as a result of falling from a height. That is more than 117 people a day. By using these five tips you can reduce the risk of injury and ensure your DIY projects are completed on time and without incident
-
Transporting your ladder safely
2 March 2023The way you transport your ladder is important, particularly if you are unfamiliar with the equipment required to do it. It is essential that you secure ladders adequately to avoid accidents when driving, and there are even laws that relate to overhang.
Longer ladders, like extension ladders, are not always possible to squeeze into the back of a car/van, so you may need to transport them on the roof. There are commercial ladder handling solutions for vehicles, which help to load and unload ladders to and from a van's roof from the ground using gas-assisted mechanisms. But for those of us without these luxuries, there are more low-tech solutions that work just fine.
The most common thing to do is secure the ladder to a roof rack or roof bars. But if you are going to transport a ladder this way, you will need to be familiar with the legal requirements involved. For the UK, these are recorded under section 26 of the Vehicle and Operator Services Agency (VOSA). It is most important to stay within the restrictions for how much overhang is permitted at the front and rear of your vehicle.
Rear Overhang
- If the overhand is less than 1 metre, then there are no requirements.
- If the overhang is between 1 and 2 metres, you must ensure the overhang is clearly visible. Many choose to mark it with a high-vis vest or bright cloth. Whatever you choose, it must be clearly visible within a reasonable distance to other road users.
- If the overhang is between 2 and 3.05 metres, you are required to have a rear marker board
- If the overhang exceeds 3.05 metres, you must give notice of 2 working days to the police.
Front Overhang
- If the overhang is between 0 and 2 metres, there are no requirements.
- If the overhang is between 2 and 3.05 metres, you are required to have a front and side marker board.
- If the overhang exceeds 3.05 metres, you are required to give the police 2 working days' notice.
Some Tips For Safe Transportation
Once you have ensured the overhang regulations have been adhered to, you will need to make sure the ladder is completely closed if it is an extension ladder. You may need to recruit some help with carrying the ladder and lifting it into position on the vehicle's roof. If you are unable to get any help, be sure that the top of the ladder is tilted upwards when you carry it.
How To Transport A Ladder Without A Roof Rack?
If you don' t have a roof rack, be sure to use pillows or cushions, or even a couple of bicycle tyres as a buffer to protect your vehicle.
How To Secure The Ladder Tight On Your Car/ Vehicle?
Lay the ladder carefully on the roof of the vehicle, either against the cushioning, roof rack or between the roof bars.
Secure the ladder at both the front and the back using ladder clamps, bungee cords, ropes or other strong ties.
It may help to take a short test drive with the ladder in a safe area, turning some sharp corners and braking abruptly to ensure the ladder is secured in place.
SHOP LADDERS -
How Shelf Ladders Can Transform Your Storage Options
2 March 2023It's common for warehouses, offices and libraries to have a lot of vertical storage space, but access issues mean these areas are not always used effectively. In this post, we're going to look at why shelf ladders are the solution you need to maximise your storage options and make files, boxes, products and books more easily accessible.
THE DIFFICULTIES PRESENTED BY HIGH CUPBOARDS, LEDGES AND SHELVES
Warehouses, in particular, are popular storage facilities for many businesses, but that doesn't mean the space available is always used to maximum effect. High racks, shelves and ledges are often too difficult to reach, especially if businesses don't have the budget for forklifts and cherry pickers. The same goes for libraries and offices too. Often, storage space which is too high or unsafe to access is used as a dumping ground for old files, books and folders which are no longer required - even worse, sometimes it's not used at all! If you're rapidly running out of room in filing cabinets and shelves which are at normal height, then there has never been a better time to consider shelf ladders.
HOW CAN SHELF LADDERS HELP?
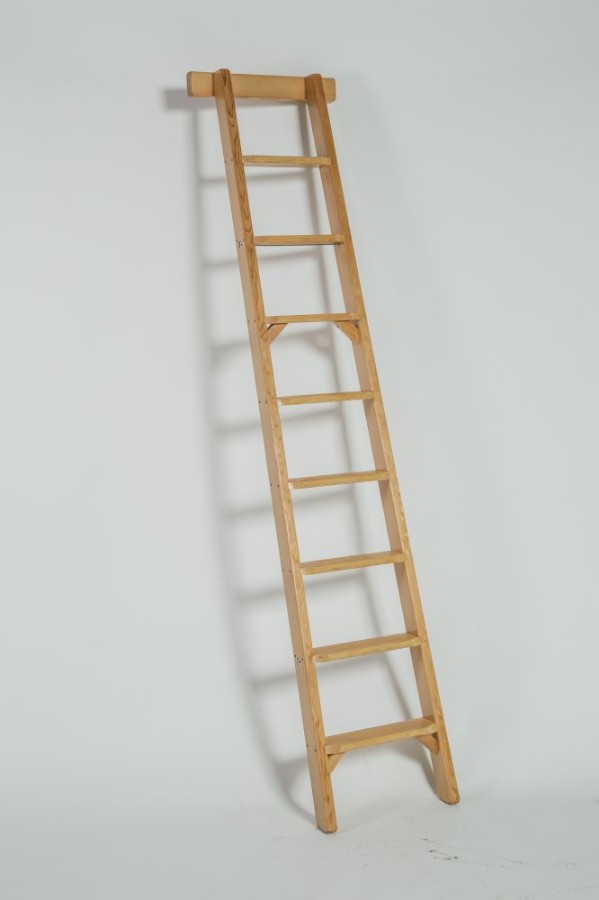
Shelf ladders are the perfect solution to accessing unreachable space whenever you need to. Their stylish design, offered in timber and aluminium here at Ramsay Ladders, fit seamlessly into your existing space and can be used as often as you like without hassle. Before purchasing one, you need to consider the height you need to reach and whether you'll be leaning it against a structure with adequate support. Equally, the floor space should be level, and you must meet the minimum clearance space surrounding it to ensure the ladder adheres to safety requirements.
HERE ARE A FEW SPACES SHELF LADDERS CAN HELP YOU ACCESS:
Shelving Racks
At Ramsay Ladders, our range of aluminium ladders come with custom handrails, hooks and locating bars, making them perfect for warehouses and offices with shelving racks. When using shelf ladders in an industrial workplace, you want to ensure safety comes first, so buying a quality product with extra strength is essential. After all, increasing your storage space will decrease the number of obstacles on the shop floor. A well-organised space will also improve productivity as stock and inventory items can be moved, stored and found easily.Cupboard Space
Remember that file you shoved on the top shelf of your office cupboard? Or the stationery you ordered two years ago, only to be resigned to the back of a cupboard and forgotten about? With shelf ladders, you'll no longer mislay items or need to climb on chairs or tables to reach them. Access ladders are a safe solution to your office's storage problems, making them a convenient addition to your workplace.Ledges and Shelves in Libraries
Although new ways have emerged over time to display and store books, many libraries still make use of high shelving units, ledges and bookcases. There are also many other factors to consider, including ensuring books aren't exposed to sunlight, they're displayed away from vents and radiators, and that books are kept upright and not leaning or laid flat. With thousands of books to arrange and sort, it will come as no surprise that many libraries have to make use of every available space, making access to them vital. With regular dusting and housekeeping required as well, the best solution for accessing hard-to-reach areas is shelf ladders. Staff can find, arrange and clean books safely using shelf ladders, and they will be able to use all the space available to them to store books away from sunlight and radiators.TRUSTED QUALITY WITH RAMSAY LADDERS
Ensure you choose the highest quality shelf ladder for your storage solutions with Ramsay Ladders. Manufactured in the UK, the 85mm deep tread on our ladders offers steady footing for prolonged periods of use. Our access ladders are ideal for professional, non-professional as well as domestic use, helping you transform your storage options wherever you are. We offer a broad range of lengths and widths to suit your space, from warehouses to libraries.
-
Loft Ladder Hatch Installation - Frequently Asked Questions
2 February 2023Lofts are a vital space in any house. They may not be the most exciting or glamorous feature of a home, but ask any homeowner with a loft and they will tell you that it's a blessing.
Lofts are the perfect storage solution, giving you ample space without cluttering up the rest of your home. Unless your attic has been converted, it's a ready-made storage unit right in your own home. However, making the most of this space requires easy access, which not every property has. If you don't currently have a loft ladder and want to make your loft space accessible for storage, it can be hard to know where to begin. Here are some of the most frequently asked questions about installing loft ladders and hatches.What Are Loft Ladders And How Do They Work?
While you can use a step ladder or standard extension ladder to enter your loft, they are not the most practical or the safest option. This is why it's best to get a specialist loft ladder installed. There are several different loft ladders available to choose from, but no matter which option you go for, it will integrate with your loft hatch and securely attach to the frame. They work in the opposite way to an extension ladder, with the ladder pulling down from the hatch. It offers quick and easy access to your loft at all times.
How To Fit A Loft Hatch
Fitting a loft hatch does require a bit of skill, so you may want to hire an expert. However, if you're handy with DIY, it's definitely something you can look into yourself.
Firstly, you need to consider whether you want a bespoke hatch or whether you're going to buy a pre-made hatch that will fit directly into an existing opening. If you have a common hatch size, a ready-made hatch will save lots of time and effort, but if not, bespoke may be the route to go down. You'll also need to consider the type of loft ladder you are going to use, as this may also dictate the hatch you go for. Read our Buying Guide to Loft Ladders for more information on this.ARE LOFT HATCHES A STANDARD SIZE?
The most common size of a loft hatch and the size needed to conform to building regulations is 562mm x 726mm. However, other common sizes include 450mm x 600mm, 600mm x 700mm and 700mm x 900mm.
HOW TO MEASURE FOR A LOFT HATCH
When you're measuring for a loft hatch, whether it's a totally new opening or an extension to an existing hatch, you need to start by measuring out the size you need, plus an additional four inches on either side. The total of this measurement should be on top of any ceiling joists within that space.
When you're measuring up, you'll also need to make sure that the area you are planning on cutting is free from wires and pipes to avoid any costly mistakes.HOW TO MAKE YOUR LOFT HATCH BIGGER
Once you've measured up and checked the area with a pipe and wire detector, it's time to enlarge the opening. The DIY Doctor offers detailed instructions – complete with diagrams – explaining how to enlarge an existing hatch.
If the space requires you to cut through two or more ceiling joists, you will need to enlist a structural engineer to keep the hatch safe and accessible. Unless you have prior experience or are incredibly handy at home improvements, it is a very technical job, so it is always best to at least consult an expert before you dive in.How To Install A Loft Ladder
Once you have a suitable and structurally sound loft hatch, installing a loft ladder is relatively easy. Our loft ladders come with easy to follow instructions.
CHOOSING THE RIGHT LOFT LADDER
There are many loft ladder styles available. They all offer the same function - safe and easy loft access - but each one suits different spaces and needs. If you regularly access your loft and need a ladder that can carry a lot of weight, a timber loft ladder is a sturdy choice, while our Original Ramsay loft ladder offers durability with a handrail for additional safety.
Those working with a tight space may find that concertina loft ladders or telescopic loft ladders are best suited.
Read out Guide to Buying a Loft Ladder for more considerations and to understand the main differences between the available options. -
Top DIY Ladder Tips For Winter Jobs
2 February 2023Ladders need to be used for all types of essential outdoor tasks during the winter, from unblocking gutterings to putting up Christmas decorations. However, using ladders during cold, wintry weather is far more challenging than in the summer. Working at height always requires the highest concentration, but distractions such as freezing temperatures, wind and snow can make ladder use particularly hazardous.
THE IMPORTANCE OF LADDER SAFETY IN WINTER
Whatever the season, there could be as many as two million ladders in use throughout the United Kingdom every single day. They contribute to approximately 40% of the 48,000 accidents involving height that occur annually. However, injuries sustained from ladder falls are proportionally higher during winter, sometimes resulting in fatalities. It's always preferable to delay using ladders during hazardous wintry weather, but if there is no alternative, the risks can be minimised by being extra vigilant.
USING THE CORRECT LADDER
An aluminium ladder is not always the best choice for the winter months. Although the metal reacts well to varying temperatures, in extremely cold weather, your hands can stick to the rails or rungs. This in turn can affect your balance when climbing or descending. Fibreglass has a high resistance to all types of weather conditions, making it an ideal choice in the winter. Wooden ladders can be affected when exposed to rain and snow. The wood absorbs moisture causing it to expand, which may affect its balance and safety.
When completing DIY tasks in the cold, a platform or swingback ladder could be the most suitable choice. Their self-supporting A-frames are often considered more stable than an extension ladder that needs to be leaned against a solid structure. As at any time of the year, select a ladder that is the right height for your task. An extension ladder should be around three feet taller than the level you want to work at. A platform ladder needs to factor in your height and reach when standing on the top step.LIMITING ELECTRICAL DANGERS
Carrying out electrical work while using a ladder can be dangerous, particularly in the winter when there is rain or snow around. Although an aluminium ladder is a lightweight, economical choice, the metal is an effective conductor of electricity. The best choice of ladder for working near electrical cables is fibreglass or wood.
UNDERSTANDING THE ‘3-POINT RULE’
The 3-Point rule evolved as a safety measure when using ladders. It means you should always have three limbs touching the ladder. It's important to climb slowly in order to alternately keep two hands and a foot on the ladder before completing the next stage of using one hand and two feet. Placing your hands on the rungs instead of the rails should provide a more reliable grip if you should slip. In addition, keep your body centrally aligned when using the ladder to maintain good balance. Avoid reaching too far to the side as the sudden readjustment of your weight can tip the ladder over.
WINTER WEATHER CONDITIONS TO BE AWARE OF
Using a ladder during winter weather means being more aware of the state of the terrain where it's to be placed. Before embarking on a particularly lengthy task, it can also be helpful to check the weather forecast for sudden changes such as snow storms or high winds. If the weather should suddenly deteriorate, it's wiser to leave your project or repair until another time.
ICY CONDITIONS
Ladders should never be placed on sheets of ice, frosty leaves or compacted snow. These are hazards that inevitably cause a ladder to slip. Black ice is especially dangerous as it's so difficult to see unless the area is inspected thoroughly. There can also be patches of waterlogged ground if ice or snow is beginning to thaw. Ladders can unexpectedly sink into soft ground causing them to topple over. During frosty weather it can be helpful to use a ladder safety mat made of rubber. An alternative is to spread a layer of grit or salt on the floor to prevent the ladder's feet slipping.
WINDY WEATHER
It's advisable to avoid using a ladder if the wind speed reaches more than 20 mph. Sudden gusts of wind are often the most dangerous as the impact can knock you off balance or tip the ladder over. Generally, the higher you climb a ladder, the stronger the wind becomes. A steady wind travelling at a lower speed can be affected by nearby buildings or steep ground. They often create a wind tunnel effect causing the strength of the wind to increase in a localised area. Never use a ladder if you have any doubts over unpredictable winds.
BEST WINTER CLOTHING FOR USING LADDERS
When using a ladder in winter, you need to insulate against the cold by wearing plenty of layers. A lightweight beanie under a hard safety hat can help retain the body's warmth. The correct winter footwear is vital for keeping a firm grip on the rungs. Choose work boots with heavy-duty, thick rubber soles that have anti-slip properties. When hands become cold, it can be difficult maintaining a steady grip on the ladder. A remedy can be found in specialised thermal work gloves with industrial strength rubber exteriors.
SAFETY ROUTINE FOR USING LADDERS IN WINTER
Check the ladder before use for signs of frozen moisture that has collected while it has been stored. Wipe the ladder to remove any traces of ice, dirt or oil. Any residue or contaminants can make the rungs slippery. Using the ladder when it's raining or snowing can make the ladder unsafe. Always climb slowly and be aware of maintaining a firm grip on the ladder.
Snow and mud can become embedded in the soles of your boots when walking to and from the ladder. Check footwear before stepping on the rungs and remove any stubborn debris. When you have finished with the ladder, it should be wiped thoroughly to remove all traces of snow, mud and moisture. Dry thoroughly with a cloth before returning to storage.When carrying out DIY tasks during the winter that involve using a ladder, it's important to stay safe. Keep ladders in a clean condition, wear appropriate footwear and follow the 3-point rule. Check the weather forecast and always abandon a task rather than risk the effects of severe winds, snow and ice.
-
Sparks & Ladders: How To Stay Safe When Using Ladders Near Electricity
3 January 2023Ladders are essential pieces of equipment for many tradesmen and maintenance workers, but they are also one of the most dangerous.
Data from the Health and Safety Executive (HSE) highlights that each year, around 1000 people suffer electric shock-related injuries, with around 30 of those proving fatal. The vast majority of these fatalities are the result of contact with overhead or underground power cables, with ladders the primary cause.
This illustrates the point that ladders and electricity are a potentially deadly combination. Employers and workers, therefore, need to be aware of the risks of using ladders around power lines and take precautions to protect themselves.COMMON JOBS INVOLVING POWER LINES
Several occupations involve working with ladders close to power lines. These workers should be provided with risk assessment training and appropriate safety equipment.
The occupations most at risk include:-
Firefighters
-
Linesmen
-
Telecommunications workers
-
Maintenance electrician
-
Installation electrician
-
CCTV installers
-
Rail workers
-
Construction workers
-
Roofing contractors
-
Crane drivers
-
Scaffolders
-
Painters and decorators
-
Arboriculturalists
-
Landscape gardeners
-
TV Aerial installers
-
Street light contractors
Along with the above occupations, members of the public are also at risk of injury when carrying out DIY tasks such as cleaning gutters, carrying out roof repairs and installing decorative lights.
ALUMINIUM VS WOOD VS FIBREGLASS
The material and construction of the ladder play a major role in the survivability of an electric shock due to accidental contact with overhead power lines. Most commercial ladders are made from either aluminium, wood or fibreglass.
Each material has its benefits and drawbacks from a safety perspective. Let's look at each material in more detail to get a better idea of its suitability for working close to overhead power lines.ALUMINIUM LADDERS
Aluminium ladders are the most popular type of extension ladders in the UK. Aluminium is lightweight, cost-effective, strong and doesn’t corrode. But it has some distinct disadvantages from an electrical safety perspective.
Aluminium is the fourth most conductive metal, after Silver, Copper and Gold. This conductivity means electricity will pass down the ladder should it touch live electrical cables.
But the conductivity of aluminium means the ladder doesn’t have to come into physical contact with the cables to induce a current. That’s why the HSE recommends that aluminium ladders should not be used within 6m horizontally of live power lines.PROS
-
Lightweight
-
Cost-effective
-
Won't rust or corrode
CONS
-
Conducts heat and electricity
-
NOT suitable for electrical work
WOOD LADDERS
Wood ladders were the de facto electricians' ladders for a long time. Wood does not conduct electricity very well so it makes a much safer ladder for electrical workers.
Wood ladders are also renowned for being robust and strong. Timber does not corrode so you can expect many years of reliable use out of your wooden ladder. Timber is also the cheapest material for building ladders, so they represent good value as well.
However, wooden ladders have several disadvantages. Firstly, they are by far the heaviest ladders and wood is susceptible to rotting, which can cause ladders to become unsafe. Plus, when wet, the rungs of wooden ladders can be slippery.PROS
-
Cost-effective
-
Don’t conduct electricity
-
Resistant to heat
CONS
-
Heavy
-
Susceptible to rotting
FIBREGLASS LADDERS
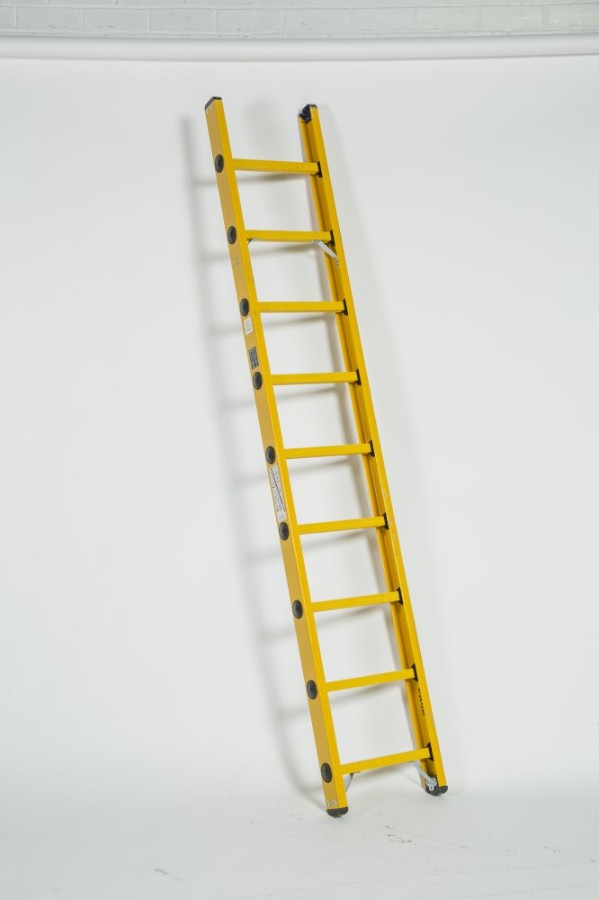
Fibreglass ladders offer the strength and durability of aluminium ladders with the low electrical conductivity of wooden ladders. They are, therefore, the ladder of choice for electrical workers or those at risk of coming into contact with live power lines.
Fibreglass ladders are also extremely strong; in some cases, fibreglass is stronger than aluminium. They are also resistant to corrosion and heat, so they can be used outside in all weather conditions.
However, there are two disadvantages of fibreglass ladders. Firstly, they are more expensive than the other two ladder types. And secondly, fibreglass ladders are typically heavier than the equivalent-sized aluminium ladder.PROS
-
Don’t conduct electricity
-
Heat resistant
-
Weather resistant
-
Very strong
CONS
-
Heavier than aluminium
SAFETY RISKS
Each year 20 people are killed and more than 400 are injured after coming into contact with overhead power lines. The risks of working close to electricity are real, but they are not immediately obvious. Many workers are simply not aware or forget that power lines are overhead.
So in this section, we will look at the different types of power lines and the risks associated with them. This will give you a better understanding of the potential for getting a shock.
The highest voltage power lines in the UK carry between 275kV and 400kV. These transmission lines are operated by the National Grid and distribute power across the UK. The minimum height of these power lines is 7m for 275kV and 7.3m for 400kV.
This is outside the operational height of most extension ladders, so the risk of accidental contact is low. But they still present risks to crane and platform operators, so care should be taken when using this type of equipment.Distribution lines bring electricity into towns and cities. They carry 132 kV and are operated by the Distribution Network Operator. The minimum height for this type of power line is 6.7m.
While these lines are beyond the operating height of extension ladders, there is the risk of an induced voltage when using aluminium ladders. So extra care should be taken when working around this type of power line.
Smaller distribution lines distribute power within towns and cities. They carry between 11 kV and 33 kV. The minimum height for this type of power line is 5.2m. This is within the operating height of some extension ladders.
Most accidental contact with power lines occurs with this type of distribution line. So when working within the proximity of such lines a thorough risk assessment should be carried out to identify the dangers and mitigate against them.SAFETY TIPS
When working near power lines, the following safety tips should be deployed to reduce the risk of electric shock:
CHECK THE LOCATION OF POWER LINES BEFORE YOU START
A risk assessment should be carried out before any activity that requires working at height. This should identify any power lines close to the work area. With all workers made aware of the dangers.
MAKE SURE THE LADDER IS SAFE TO USE
The ladder and any associated equipment such as harnesses should be inspected before use. Specifically look for cracks, corrosion, secure feet and locking mechanisms. The ladder should also be clean and dry before use.
ALWAYS CARRY LADDERS IN A HORIZONTAL POSITION
When carrying ladders they should always be held in a horizontal position. Never carry ladders in a vertical position. This significantly increases the risk of accidental contact with overhead power lines.
POSITION LADDERS CORRECTLY
Always use a fibreglass ladder when working close to live electrical cables. And position the ladder in such a way that it can not fall onto overhead lines. Ideally, the distance to the nearest electrical cable should be at least twice the length of the ladder.
ENSURE THE LADDER IS SECURELY POSITIONED BEFORE USE
Before climbing the ladder, make sure it is positioned securely on the ground. Use a stabiliser on uneven or sloping surfaces and a ladder stopper to prevent the ladder from slipping under load.
CONCLUSION
Aluminium ladders and electricity don’t mix. Workers operating close to overhead power lines should therefore be supplied with fibreglass ladders to reduce the risk of electric shock.
Ramsay Ladders are one of the UK's leading manufacturers of ladders for the construction and utility industries. We supply a range of fibreglass step, single and extension ladders designed to protect workers from electric shock. Check out our range of ladders today. -
-
How To Take Care of Your Roof Ladders
3 January 2023Roof ladders are useful for any type of work that may be carried out on a roof. Also referred to as cat ladders, they differ from standard ladders as they have a hook that attaches over the top of a roof, which secures the ladder in place. While it may seem like a chore to take care of them properly, with these quick and easy tips you can efficiently take care of your ladders for all-year round use.
THE IMPORTANCE OF SAFETY
Taking good care of your roof ladders is vital to ensure that they are safe, dependable and won't contribute to any accidents. According to Commodious, one in five fatalities in the construction industry are the result of roofing accidents.
Many of these roofing accidents occur due to incorrect use of ladders or having ladders that are not properly maintained. However, with the right level of maintenance and provided training, the risk of accidents on ladders can be massively reduced.
So, bearing these pertinent statistics in mind, here's what you need to think about to properly take care of your roof ladders.HOW TO STORE ROOF LADDERS
It's not just how you use your roof ladders that matters, but how you look after them when they're not being used is equally as important.
When it comes to storing roof ladders, it's crucial that they aren't kept anywhere that may be damp, particularly if the ladders are constructed from wood, as this may encourage them to rot.
As well as keeping them away from damp areas, roof ladders shouldn't be stored in any areas that may get very hot. In particular, fibreglass ladders shouldn't be exposed to temperatures above 93°C.
Make sure the area where the roof ladders are stored receives sufficient ventilation, so if they're kept in a garage, for instance, open the window, if there is one, from time to time to let air in.
Ladders should be stored horizontally as opposed to vertically, and to avoid sagging, provide support for the ladders at two-metre intervals.TRAVELLING WITH ROOF LADDERS
Transporting your roof ladders safely is crucial so that they don't get damaged during transit and that they remain secure. After all, a ladder falling off your vehicle roof isn't a scenario you or your fellow road users will want to encounter! You can easily attach your roof ladders to your vehicle with a suitable roof rack and clamps, so the ladders are unable to move around and won’t suffer from any damage. For a more in depth guide, see our guide to transporting your ladder safely with specialist tips and advice.
Having clamps in place also prevents your ladders from getting pinched, which could prove costly and inconvenient. It is important to not be tempted to fix ladders in place on a vehicle using ropes or a cord; these aren't secure enough. As well as this, ladders that overhang a vehicle should also be made visible to other road users, which can be done by attaching a visible marker or coloured flag to them.
PROPER MAINTENANCE OF YOUR ROOF LADDERS
Roof ladder maintenance is imperative and must be carried out regularly so that any problems can be promptly identified and fixed before you need to use them again. That said, you should always check the ladders prior to using them, as damage may have occurred during the interim.
Ensure that you give your ladders a thorough inspection, by particularly paying attention to any areas that look worn, appear damaged, loose, bent, or rotten, etc. as well as this, you should also make sure the locking mechanisms, safety clips and brackets function properly before hauling the ladder up a roof.
If you happen to spot any issues with your ladders, then it is vital that you take them out of action immediately and get them repaired or replaced, depending on the extent of the damage. Should you need to get parts replaced, contact the manufacturer for guidance and advice.CLEANING ROOF LADDERS
Many problems can be prevented from occurring by ensuring that your roof ladders are regularly cleaned and looked after. You can easily do this by removing any accumulated debris and paying particular attention to the insides of the ladder rungs which can stop parts of the ladder from suffering wear and tear, resulting in damage.
How you clean your roof ladders often depends on what material they're constructed from. For instance, a steel wool pad and soapy water can be used to clean aluminium ladders, while wood and fibreglass ladders are more suitable for cleaning with a rag or sponge and soapy water. Once your ladders are dry and in a good condition, apply a suitable wax to the side rails, contact areas and locking mechanisms, to lubricate and protect them.
USING YOUR ROOF LADDERS PROPERLY
It is important to ensure that you only use your roof ladders for their intended purpose, as well as making sure that their size and type is appropriate for the style of roof that you're working on. For example, you should be able to access the roof safely with the ladders in tow, making sure they don't get knocked when climbing onto the roof. This is because the incorrect use of ladders not only risks damaging them and the roof, but it could also be a healthy and safety hazard, putting your life in danger.
If you need to know more about how to store roof ladders or more about roof ladder maintenance, we have all the information you need on our website. Here at Ramsay Ladders, we have all of your roof ladder needs covered, with different styles and sizes fit for any roof job you have in mind. Whether you’re looking for single and double roof ladders, extensions or brackets, we have an extensive collection of high-quality and durable products for you to purchase. As well as roof ladders, we also have a selection of other ladders and also ladder accessories and equipment perfect for many types of jobs.
-
Step Ladder vs Step Stool - Whats The Difference
1 December 2022Staying safe when using equipment that lifts you upwards is, of course, the top priority. However, choosing the right type of ladder is also very important and can also improve your productivity.
If speed is important, it can be tempting to rely largely on a simple step stool to get the job done. Whereas the stepladder has more steps and therefore a wider range of height options. Both are free-standing equipment for working at height, with a distinctive A-shape.
However, which one is best? We answer that and more questions in our ‘step by step’ guide to step ladders vs step stools.SAFETY REGULATIONS
The Health and Safety Executive provides clear guidance on using step ladders safely, as part of its work to reduce the substantial numbers of workplace injuries caused by falls.
The HSE also mandates that employers and individuals should “ensure equipment is suitable, stable and strong enough for the job, maintained and checked regularly.”
But how do you know your equipment for working at height is ‘suitable’ for the type of tasks you are doing? Should you opt for a step ladder or step stool?
Let’s explore that by looking at each type of equipment, and its advantages and disadvantages.WHAT IS A STEP STOOL?
This is generally a compact, lightweight system for creating a small amount of elevation while you work. A step stool folds out and offers one or two levels for you to stand on.
Though they are relatively simplistic, there are still important safety features to look for when buying step stools.
Firstly, does it open easily, suggesting it's new or at least well maintained? The best step stools have firm grips on their legs and a slip-proof cover on each level, as well as a top frame that helps you to gauge how far you can lean forwards.
Just like different categories of ladders, the materials used for step stools can be aluminium, wood or steel.OPTIONS FOR STEP LADDERS
Clearly, you can buy ladders that extend much further than that, but they would have 'rungs', not steps and would not be freestanding equipment.
Folding step ladders will also feature firm grips at the base of each leg, non-slip tread on the steps, and an arm on either side that clicks into place to hold the frame rigid. Some also have that additional guard rail at the top, to prevent you from leaning too far forwards.
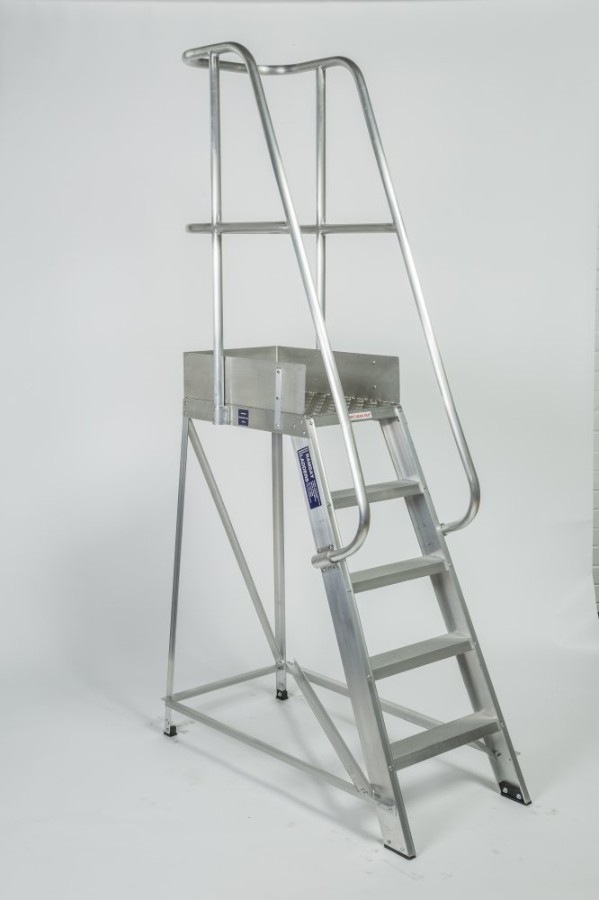
Look for a platform step ladder, such as these Heavy Duty Platform Steps if you need one that enables you to stand at the very top level safely.
Here at Ramsay Ladders you can choose from fiberglass, timber and aluminium step ladders, all of which are strong, compliant and durable.SO, STEP LADDER OR STEP STOOL?
As the above overview shows, the main difference between these two types of equipment is height.
Folding step ladders enable you to work much higher, but still with the added assurance of a firmer foothold than ladders, and a secure supporting frame.
The rule of thumb, therefore, is that if you need to reach further than around 12 feet, a step ladder is your best option. The additional reach (and therefore versatility) of a step ladder makes it ideal for working safely on the sides of buildings, in warehouses and in agricultural settings, for example.
Step stools are ideal for indoor activities, such as for use in stock rooms, or for gaining height to carry out low-level tasks swiftly.
Browse our range of expertly designed and manufactured step ladders, and if you need further help in deciding which one is best for you, don’t hesitate to get in touch. -
Ladder Classifications - Everything You Need to Know
1 December 2022Every portable ladder that is produced or sold in the United Kingdom or European Union will be manufactured to specific regulations. This means they meet certain criteria and will have a specific classification which explains the settings they can be used in safely. Portable ladders include all step ladders, extension ladders and platform ladders.
Any ladder that is classified as a ‘single-use’ ladder – i.e. a specialist ladder used for a very specific purpose, such as a loft ladder - is not classified using the same system, so you will only see these classifications applied to portable ladders.
Within the classification system, there are three main classes that you need to be aware of: Class 1, Class EN131 and Class III. You can use the classification of a ladder to understand the safe working load that the ladder can support, judging whether it is appropriate for the situation you wish to use it in.How are ladders classified?
Which classification a ladder falls into is defined by the level of weight it can safely hold.
Maximum Load Duty Rating This is defined as the weight of a single person and any equipment that they need to carry up the ladder. This is sometimes also referred to as the ‘safe working load’ Previously, ladders were defined by their ‘duty rating’ which was a value based on the expected frequency of use, and the type of environment the ladder was suitable for use in. Class 1 Ladders
Class 1 ladders are intended to be suitable for industrial applications and will have a maximum load in excess of 175kg. This is the highest possible rating in terms of the strength and quality of ladders, making them the most suitable for heavier use and industrial environments.
Class EN131 Ladders
This classification was introduced by the European Ladder Certification Standard and replaced the original Class II British Standards specification. It is a fairly wide classification, also known as BS EN131. These ladders are considered to be suitable for most commercial or light trade work – or alternatively may be a viable option for heavy-duty DIY use at home.
In 2018, new sub-categories of “EN131 Professional” and “EN131 Non-Professional” were introduced. However, as these are relatively new additions to the classification system, the product standards are not being applied retrospectively to existing EN131 ladders. This means that they are still perfectly legal and fit for use.Class III Ladders
These ladders are only suitable for use in light domestic tasks, and should not be considered as a suitable option for a commercial or a trade environment. They are generally considered to be a lightweight option, and home users who intend to use the ladder for heavier-duty tasks may still wish to consider an EN131 ladder.
How can I tell what classification a ladder is?
All ladders that are for sale online should clearly show the classification in their description. If you are shopping in a physical store, you should expect to be able to see a simple colour-coded sticker that provides an indication of what classification the ladder is.
Generally, Class 1 ladders will be marked in blue, whereas Class EN131 ladders are commonly identified by a green or yellow label. The third class, Class III ladders, can be identified by a grey label. Shops may choose to display these stickers on the accompanying labels or signage where a ladder is displayed, or they may appear on the ladder itself. If the stickers are on the ladder, it’s common for them to be placed on the rubber feet at the base of the ladder, or on any user instruction labels that are physically attached to the ladder.Sub Categories
Within the three main ladder classifications, British Standard subtypes exist. These include BS 1129:1990, which is used to indicate timber ladders (including trestles and lightweight stagings), and BS 2037:1994, which applies to metal ladders. -
Guide to Loft Ladder Installation
1 December 2022Purchasing a loft ladder is the first step in gaining access to valuable loft space for storage. The next step is installing it.
We have put together this introductory guide to help get you started. Please understand that each of the different types of loft ladders available from Ramsay Ladders is somewhat unique. As such, each ladder will have its own distinct installation requirements. This guide is intended to help you understand the basic process of installing a loft ladder.
Here are the tools you will need:- Tape measure
- Hammer and screwdriver
- Square
- Panel and tenon saws
- Utility knife
- Drill (corded or cordless)
Installation will also require pins, nails, and screws.
STEP #1: CREATE OR MODIFY THE HATCH
The first thing you will need to do is either create or modify the hatch for your new loft ladder. If you are replacing an existing ladder, you may find that the hatch is not the right size. In many cases, width isn't a problem; it is only length you'll have to worry about.
You can extend the length by removing the trimmers at one or both ends of the existing hatch, cutting away additional joist material, and reattaching the trimmers. You will have to extend the side trimmers if they exist. Replace them or insert additional wood. In the absence of side trimmers, you are looking at floor joists on either side. You don't need to do anything with them.
If you need to create a hatch where none previously existed, you must be careful not to cut any timbers that provide structural integrity, or you could potentially weaken the roof or loft floor. The DIY Doctor recommends consulting with a structural engineer or another qualified professional if you are at all unsure about locating a new hatch. Incidentally, the DIY Doctor offers detailed instructions – complete with diagrams – explaining how to enlarge an existing hatch.STEP #2: INSTALL SUPPORT BATTENS
With your hatch ready to go, you'll need to install support battens next. The point here is to create a support system that will hold your loft ladder box frame in place while you affix it to the opening. These battens will have to support the entire weight of your loft ladder, so make sure they are firmly affixed with screws. You can see an example of this step, from the DIY Network, here.
Your battens will be installed along the bottom edge of the hatch opening so that when the latter frame is installed, it is flush with the ceiling. Some people choose to leave the battens in place once installation is complete. These can be removed if you prefer.STEP #3: INSTALL NEW TRIMMERS
If you are installing new trimmers over the top of the existing ones, now is the time to do it. Measure and cut your trimmers as needed. Then affix them in position with nails. Remember that trimmers are mainly cosmetic in nature. Caution when cutting and nailing minimises the risk of damage.
STEP #4: INSTALL THE LOFT LADDER
This next step is going to require assistance, so ask a friend or family member to help. One of you will be in the loft while the other is below the hatch opening. Assume you are the one in the loft, your partner will lift the loft ladder through the opening and hand it to you. You will rotate and set it on top of the previously installed battens.
From below, your partner should check to make sure the ladder frame is flush and square. You can move the assembly from up top as necessary. Once you are both satisfied with its position, it's time to drill holes at each end of the box frame. Then affix the frame to the hatch with screws.
Instructions that come with your loft ladder should explain where to locate the screws and the correct number to install. Note that you may have to attach one or two screws first, then extend the latter in order to gain access to the rest of the box frame.
SPECIAL NOTE: Before you drill holes and insert screws, make sure you have installed the loft ladder in the correct position. It is easy to place it in the hatch backwards. Doing so will require starting over.STEP #5: FINISHING UP
With your loft ladder secured in place with screws, you are ready to finish up. Extend the ladder to make sure it fits properly. Depending on the ladder you chose (see our loft buying guide here) and the space you are working with, you may have to trim the legs. After that, installing optional trim around the hatch opening is all that remains.
Your ladder may have come with a trim plate built in, mitigating the need for extra trim on the ceiling. If not, you can still choose to not trim the opening. Adding the trim is purely aesthetic; it is not a structural requirement.
With moderate DIY skills and the help of a friend or family member, you can probably install your new loft ladder in just a couple of hours. Your two biggest concerns are cutting into floor joists and lifting your new ladder into place. Manage those two things correctly and all should be well.
Once again, bear in mind that this guide is intended to be general in nature. For more detailed instructions, speak to one of our representatives. -
What Size Roof Ladders Should I Get?
1 November 2022Ladders come in a wide variety of sizes and dimensions, each appropriate for use on different properties. Modern ladders also typically come with a range of extra features to suit particular functions. If you need to access the roof of your property, you are going to need to purchase roof ladders for the jobs you need to complete. But very often, the choice of what ladder is right for both yourself and your property is far from obvious.
THE SIZE OF LADDER FOR A ONE OR TWO STORY BUILDING
Undoubtedly, the biggest deciding factor will be the height of your home. As a rule of thumb, a 15-18ft ladder will suit a single-story building while for a two-story building, a 20-22ft ladder should do the trick. However, this is only a rough guide, and you’ll want to consider much more besides ladder height.
Naturally, a roof ladder has to be sturdy and secure if it is going to be used for an extended period on roofing jobs. Many such ladders will also have extra features such as non-slip rungs, gutter guards, and non-slip hooks, all of which make a real difference when conducting a roofing job.WORKING AT HEIGHTS: USING DIFFERENT TYPES OF LADDERS SAFELY
Despite the many things to consider when buying roof ladders for your home, the primary one will of course be height. Whether you are doing a roof job for your own home or at work, there are many safety factors that you need to consider when working from a height. Whether you are using roof ladders or extension ladders, knowing how to stop your ladders slipping when you’re using them is valuable safety information to know.
Single and double roof ladders are designed specifically to make accessing the roof a lot easier. Both types of roof ladders are fitted with wheels so that they are able to easily slide into place without causing damage to the roof. These ladders are made with strong but lightweight materials so that they are able to be moved easily while you are doing your job.Another consideration when working at heights is actually how easy it is to get on a roof to complete the job you need to do. As mentioned, there is a general rule of thumb regarding ladder height and the number of stories of your house. Nevertheless, there are times when you may wish to calculate things a little more accurately – or allow for added complexities.For one thing, many homes have multiple roofs. There can be both a high roof at the top of a home and a lower one over, say, an extension or garage. In such cases, you’ll most likely want to avoid buying two ladders, so a wide extension length is important.
For larger jobs, you might want to consider using extension ladders instead. For extension ladders, there’s a few safety things to consider for working at heights and getting up to the roof. Generally speaking, four rungs from the very top of the ladder is the highest point at which it is safe to stand. Therefore, you’ll want to make sure that your ladder clears the edge of your roof by a few feet.
But of course, no ladder is placed totally parallel with a wall. So when setting a ladder, it is important to use the 4:1 ratio rule. This rule stipulates that for every four feet in height, the base of a ladder should be placed one foot out from the wall.
Thus, a 20ft ladder would be placed five feet from the base of the wall. You can think of this also as constantly maintaining a 75-degree angle regardless of the height of the ladder. Remember also that a 20ft ladder will not, because of that angle, reach 20ft into the air.CHOOSING THE RIGHT LADDERS FOR THE JOB
After taking all the guidelines and safety information into account, you should have all you need to select the right size ladders for your property. However, beyond size, you might want to consider just what the ladder will be used for. If you expect to have jobs that will involve extended periods actually on the ladder, you’ll want to prioritise a sturdy frame and plenty of rubber grips.
If you are doing smaller jobs in the workplace and at home that don’t require working from a very high height, step ladders come in a variety of sizes and materials. But if you are working higher up from the ground, for example when needing to wash windows, window cleaning ladders would be best suited for the job.Rubber non-slip technology is essential for the rungs and the base, especially when the ladder is expected to bear the load of a person for an extended period. Ultimately, selecting the right ladder comes down to getting the right height for the task you want to do and whether your job is being done at home or professionally.
Here at Ramsay ladders, we have a wide range of high-quality, durable ladders to choose from no matter which job you aim to do with them. We even provide beneficial guides and safety information for customers to read to inform them on how to use ladders properly and safely. If you have any questions about our selection of ladders, or would like to find out more about which ladder is best for you, please get in touch with a member of our Ramsay Ladder team today. -
Guide To Telescopic Ladders
1 November 2022Telescopic ladders are a popular solution for those looking to save space, as unlike standard ladders they can be easily stored in cupboards, sheds and even car boots. Despite being much smaller in their design, when telescopic ladders are fully extended they are still long enough to access most household spaces, such as ceilings and loft access points.
Here at Ramsay Ladders, we are often asked many questions about our range of telescopic ladders, so we decided to compile this useful guide. This condensed article will provide you with the key facts you need to find the ideal telescopic ladder and to use it safely.What Are Telescopic Ladders?
In contrast to conventional ladders, the innovative telescopic ladders are designed to fold in on themselves in the same way as a telescope retracts, hence the name. This means they can be stored, moved, and assembled easily, which saves time and energy.
One of the main benefits you will find is the versatility of a telescopic ladder, as the height can be easily adjusted to suit the job in hand. There is no need to extend the ladder fully, instead you can raise and lock the number of rungs required for the task.How To Find The Best Telescopic Ladder For Your Needs
Telescopic ladders can vary widely in price; however you should never compromise safety in an effort to cut costs. If there is a ladder available which is much cheaper than other options, it may be too good to be true. As a reputable supplier, we only provide the highest quality telescopic ladders which have been tested to ensure they meet the strict regulatory requirements.
In general, the ladder you choose should be able to extend at least 1m above the top of the surface which it will be resting against. It is also worth bearing in mind that the highest step you should stand on will be the third from the top. Whether you are a window cleaner looking for an easy to store ladder or a homeowner searching for a ladder to access your loft, our team can help you find the ideal ladder height.
In addition to the actual maximum height of the ladder when extended, you will need to consider the foldaway size. In general, the longer the ladder, the larger it will be when folded away. If storage space is a concern, you may need to opt for a shorter ladder rather than the largest from telescopic ladder size options available.
Another factor which we always advise our customers to consider is the ease of use of potential ladders. The best telescopic ladders are simple and smooth to collapse with easy-to-use lock mechanisms. We also recommend choosing a ladder with a light aluminium frame, as it will be strong yet light enough to carry.
If the weight-bearing capacity of your ladder is important, you may have to sacrifice the lightness and portability for a stronger design. However, the majority of telescopic ladders are perfectly adequate for supporting average loads. If you do find that the ladder flexes slightly when in use, it is probably because the rungs are slightly narrower than a traditional ladder. However, if in doubt, climb down and reevaluate the situation.How Safe Is A Telescopic Ladder?
To ensure you are using a safe telescopic ladder, you will need to purchase one that meets the latest EN131-6 standards for telescopic ladders. To conform to these standards the ladder must feature:
- Rungs which are at least 50% larger than a conventional ladder.
- Rungs must be angled in a way which provides additional comfort and grip.
- Rungs must make it clear that a ladder is safe to use via individual lock and release indicators.
- Safety closing mechanism which slows the folding process to protect the user from injury.
- Feet must be over-moulded with durable rubber used to improve grip and maximise contact with the ground.
- Locking mechanisms must be comfortable and easy to use.
How Do Telescopic Ladders Work?
The actual design of telescopic ladders means they have more moving parts than traditional ladders, so it is important to use the various locks and mechanisms in a safe way. Telescopic ladders are designed to be quick, safe, and easy to use, although not every ladder will function in the same way. It is important to read the specific instructions relating to your ladder, however, in general, the following steps relate to the majority of telescopic ladder setups:
- Release the strap which is securing the extendable sections of the ladder.
- Position the ladder on a clean floor at the correct angle, so that it is ready to be extended into place.
- Stand on the bottom rung to firmly press the ladder into place and remove the connector from the top rung.
- Gradually extend each rung to its full reach and secure the individual locking mechanisms as you go.
- Repeat step 4 until the ladder is extended to the desired height and avoid stepping on the top rungs. Once the ladder rungs are locked in place you will not be able to adjust the individual rungs, as this will tamper with the overall stability of the ladder.
- Before climbing the ladder check for signs of obvious visible damage and ensure that all locking mechanisms are working correctly.
When you have finished using the ladder there are a few steps to follow to ensure it's correct and safe to collapse. Obviously, you will need to be careful not to place your hands between any of the rungs. To avoid injuries the following steps should be followed:
- Hold the ladder by the couplings which are located below each rung and use your thumbs to unlock each lock simultaneously.
- The upper stage of the ladder will collapse, allowing you to unlock and collapse the next rung.
- Once all rungs have collapsed inside themselves the strap can be used to secure the ladder in place.
What Positions Can Telescopic Ladders Be Used On?
This is a very common question, as many customers often wonder whether these ladders have to be fully extended. In general, the better-quality telescopic ladders can be partly extended, so they will be completely flexible to your needs. In addition, there are some telescopic ladders which can be used as A-frame step ladders, which many people are more familiar with.
You will find that when you browse the available options there are a variety of ladders which support multiple configurations, which are commonly referred to as multi-position ladders. However, these are more expensive, and they are more likely to be found in commercial spaces than smaller home environments where a simpler solution is required.Choose Ramsay Ladders For Your Telescopic Ladder
When it comes to telescopic ladders, you can count on the experienced Ramsay Ladders team to help you find the best option. From the smaller 3.3m standard telescopic ladders to the larger 3.8m height size, we have options available for every customer. To find out more about our high-quality range of space saving telescopic ladders, please browse our telescopic ladders or contact our team today.
-
A Buying Guide to Loft Ladders
3 October 2022Lofts are the perfect solution for gaining much needed storage space in your home. They provide that extra space for storing belongings that would otherwise fill the rest of your home with clutter.
The big challenge with loft storage is access. Most of us are content to rely on ladders never designed for such purposes. If this sounds like you, a loft ladder is the solution. Loft ladders make accessing loft space a lot easier, allowing you safe access to your storage space whenever you need it.
Ramsay Ladders specialises in designing and manufacturing custom-made ladders using the latest technology and innovations. We also carry a vast selection of stock ladders to meet just about any need. We have put together this guide to help you choose the perfect model for your home.WHICH LOFT LADDER IS BEST?
We carry several types of loft ladders in order to give our customers plenty of choices. Here are brief descriptions of each type:
1. Sliding Loft Ladder (AKA The Original Ramsay Loft ladder)
The sliding ladder is the original loft ladder. It is suitable for most homes. The sliding ladder is characterised by two or three sections that slide out to extend from hatch to floor. They easily slide back when the ladder is retracted. Sliding ladders do require a fairly sizeable hatch, but most homes can accommodate them. They need only a single bracket fixed over the hatch edge.
Take a look at our Sliding Loft Ladder (AKA The Original Ramsay Loft ladder).2. Folding Loft Ladder
The folding loft ladder is similar to the sliding ladder except that the sections fold on top of one another instead of sliding into a frame. This type of ladder is ideal for customers who prefer wood over aluminium. A single bracket over the hatch edge keeps the ladder in place. It is supported by hinged arms on either side that fold in and out of the way when the ladder is retracted.
Take a look at our timber folding ladder.3. Telescopic Loft Ladder (AKA The TELESTEPS Loft Ladder)
Ramsay Ladders offers the first truly telescopic loft ladder in the industry. Each section of the ladder slides into the section above to fully retract and hide away. Pulling down on the bottom section with a poll causes each subsequent section to telescope outward and extend the ladder. The main advantage of this type of ladder is its compact nature. It is secured by just six screws and can be installed in even the smallest spaces.
Take a look at our Telescopic Loft Ladder.4. Concertina Loft Ladder
The concertina loft ladder is another excellent choice if you are looking for a compact unit. This one is designed on the accordion principle, with treads mounted on triangular accordion rails that fold up into a very compact rectangle. The compacted frame then folds up into the hatch. The entire ladder is controlled by springs providing just the right amount of tension for easy retraction and extension. The ladder can be fitted to a ceiling hatch or a wall access hole.
Take a look at our Concertina Loft Ladder.MEASURING FOR YOUR NEW LOFT LADDER
To assess which loft ladder is most suitable to your needs, a few key measurements are required. The three basic measurements for all types of loft ladders are:
- hatch length
- hatch width
- ceiling height
Ceiling height is the distance from floor to ceiling in the space in which you intend to install the ladder. It is not the height of the loft ceiling.For our folding loft ladder, two additional measurements are required:
- Floor Clearance – This is a measurement of the amount of floor space available for accommodating the fully-extended ladder. You generally only need the length of the space, measured outward from the rear of the hatch. You can hang a plumb line down from this point and then measure from there.
- Folding Clearance – Folding clearance is the amount of lateral space available for actually folding and unfolding the ladder. In an open space, like a bedroom, the amount of clearance may be affected by furniture. If you are installing in a hall, you may have to account for a banister or the landing for the stairs.
For a more detailed rundown of which dimensions are needed for the different ladder types, take a look at our brochure or call us on 01307 462 255 and we will be happy to help.MATERIAL CHOICES - TIMBER OR ALUMINIUM?
Loft ladders can be purchased in either timber or aluminium construction. Is one better than the other? Not really. Wood ladders are strong and reliable. They are capable of supporting fairly heavy loads, heavier loads than aluminium ladders in some cases.
Wood is a material that makes for more comfortable ladders as well. It is slightly more flexible and capable of absorbing more shock. And if you like wood's aesthetic appeal, it may be the obvious choice. The big downside to wood ladders is that they need more space. They are also bigger and heavier than their aluminium counterparts.
Aluminium is a much lighter material. Therefore, aluminium loft ladders are easier to handle for people with limited strength and stature. Unlike wood, aluminium is perfect for telescopic and concertina designs. And because aluminium offers good tensile strength, loft ladders can be made smaller and still support the same amount of weight.
As for the downsides, aluminium can feel less stable than wood. It tends to make noise under heavy loads, making some homeowners nervous. You also don't get the same rustic look with aluminium.LOFT LADDER USAGE AND DURABILITY
Accessing your loft on a limited basis suggests you might be fine with an entry-level model, such as our Domestic Loft Ladder . But if you access your loft frequently, looking at something a bit more robust is probably a good idea, such as our popular Ramsay Original Loft Ladder. The more usage and the heavier the loads, the more likely you will need a heavy-duty ladder capable of taking a significant amount of punishment.
HOW MUCH DO LOFT LADDERS COST?
Loft ladders do not cost much when you consider the benefits of opening your loft for more storage. Compared to paying for external storage, a ladder could pay for itself in just a few months. Here's what we offer at Ramsay Ladders:
Domestic Sliding Ladder – starting at £114
Telescopic Ladder – starting at £171
Timber Folding Ladder – starting at £172.80
Concertina Ladder – starting at £208.32
Ramsay Original Sliding Ladder – starting at £257.59
All listed prices are entry-level prices. Your actual price may be higher based on your options. Note that we lay out all pricing clearly so that there are no surprises.
WHERE TO BUY A LOFT LADDER?
We encourage you to consider Ramsay Ladders for your loft ladder purchase. We have been in the business more than 50 years, designing and custom-building ladders for both domestic and commercial applications. Each of our loft ladders is constructed without interfering weights or wires. They are designed to be easy to use regardless of age or ability.
You will also appreciate our nationwide delivery network. Regardless of where you live, we can deliver your ladder in a timely fashion following your order. We will even give your order priority if your chosen ladder is not currently in stock. We will expedite whatever we need to get your ladder to you quickly.
Please note that loft ladders are only to be used for accessing a loft as a storage space. If you are using your loft as a living space, you will need permanent stairs fitted instead. They will need to comply with all building regulations. -
What is a Swingback Ladder?
3 October 2022One of the most popular pieces of equipment for DIY projects or professional work is a folding step ladder. It's indispensable for tasks requiring moderate height, both inside buildings and out of doors. Although a platform ladder is commonly the first design that comes to mind, many people prefer to choose the swingback ladder. As a multi-purpose ladder, it's convenient and versatile with several advantages.
SWINGBACK LADDER VERSUS PLATFORM LADDER
The swingback ladder has a simple, but sturdy, 'A' frame design. The front section is fitted with a series of flat steps known as treads. The width of the ladder usually narrows considerably as it nears the top. It terminates in a small flat ledge that can be used to hold tools. The ladder folds flat for storage and when opening it, you swing the back section outwards and into position.
The platform ladder is also an 'A' frame style with flat treads on the front half. However, near the upper end, there is a wide, folding platform that provides a large space for positioning tools or pots of paint. The stiles or sides of the ladder usually extend above the platform. The ladder folds flat for storage.WHY IS THE SWINGBACK LADDER DIFFERENT TO OTHER LADDERS?
One of the main reasons why the swingback ladder is popular is its design. Health and Safety guidelines recommend you should never risk standing on either the top three rungs of any ladder or the large surface at the top of a platform design. The tapered stiles of the swingback ladder make it difficult to step on the treads nearest the top. By comparison, the platform ladder with its generously sized terminal tread, offers the temptation to risk your safety by standing on it. Doing so leaves very little support to help maintain your balance.
HOW SAFE IS A SWINGBACK LADDER?
The wide-angled base of the swingback ladder provides effective stability when placed on a smooth, level surface. The relatively narrow treads towards the top are convenient and sturdy for you to grip. The Health and Safety Executive advises using the hand holds as a guideline on how high to climb. You should always be able to hold onto treads that are within comfortable, easy reach. Always choose a swingback step ladder that has a greater height than the level you want to work at. A twelve tread swingback ladder usually reaches a height of around 3.5 metres.
HOW TO SAFELY USE A SWINGBACK LADDER
Whenever you use a swingback ladder, you should routinely make a few checks regarding its safety. Overall sturdiness is a priority as any loose sections can cause the step ladder to unexpectedly collapse. Check the stiles are straight. If they are bent or misshapen they could affect the balance of the ladder, resulting in it toppling over. The stability of the swingback ladder can be seriously compromised if one or more of the protective feet at the end of the stiles are damaged or missing.
The locking bars at the sides of the stiles keep the ladder's structure rigidly in place. If the locking bars are broken, loose or bent, the ladder could be hazardous. The individual treads can easily be splashed by substances such as grease or wet paint. These can cause you to slip, so don't use the step ladder until the contaminants have been safely removed.SAFELY POSITIONING THE SWINGBACK LADDER
The swingback ladder should be placed on level ground. The frame should feel stable without rocking to and fro. Clear debris from around the ladder to provide you with a clear space when stepping off the bottom tread. Ensure that any nearby materials such as lengths of timber or crates are stable. If they should suddenly fall against your ladder they could knock it off balance causing you to fall. Never work directly behind a closed door as anyone entering the room could accidentally push your ladder over. Check the height above the ladder can accommodate you when standing nearer the top. Beware of colliding with low ceilings, overhead pipes and electric cables.
WHAT MATERIALS ARE BEST FOR SWINGBACK LADDERS?
The swingback ladder is a versatile step ladder that is available in several materials. The original folding step ladder invented in 1867 by John H. Balsley of Ohio was made of wood. It's still a popular choice today for swingback ladders. However, timber swingback ladders are often uncomfortable to carry due to their excessive weight. For instance, a ten-tread version can weigh an average of 20 kg compared to 11 kg in aluminium and 16 kg for a fibreglass step ladder. Timber frames are also prone to deterioration and warping, particularly when stored or used in damp conditions.
Aluminium swingback ladders are usually the least expensive. They often provide a wide range of heights with up to twelve treads. The metal is resistant to corrosion and extremely lightweight to manoeuvre. It means large aluminium swingback ladders can often be handled by one person. Its strength to weight ratio is even greater than steel. Aluminium swingback step ladders are ideal for completing a succession of tasks in different locations.
Fibreglass is strong and durable. The material is manufactured from a plastic resin reinforced with fibres of glass. The step ladders are often available in vivid colours making them ideal for working in poor light conditions.HOW TO FIND THE BEST SWINGBACK LADDER FOR YOUR NEEDS
Swingback ladders need to be lightweight if you have to frequently move them to different locations. Always choose a swingback ladder that provides plenty of height for your tasks. When working outdoors, choose a material that can easily withstand damp weather. Your swingback ladder conveniently folds flat for storage. It should provide excellent service for many years.
-
How Often Should Your Ladders Be Inspected?
1 September 2022Health and safety is an extremely important consideration when using ladders of any type, whether at home or at work. The statistics say it all - approximately 48,000 people in the UK end up in hospital each year from falling off a ladder, with 40% of all falls from a height caused by ladder accidents.
For this reason, it's essential that ladders should be in good working order, whether you use step ladders for getting something off a high shelf, loft ladders to go into the attic or extension ladders for DIY jobs.Inspecting Ladders
To ensure ladders are in tip-top condition, they need regular inspections, but how often should this occur?
Experts reckon that you should always give ladders a quick once over every time you use them, or if you move them to a different position.What To Look For
- Cast your eyes over the stiles, or side rails, of the ladder to look for any areas that may be bent, worn or damaged. Check every rung on the ladder to ensure it is strong and stable, taking note of any that are bent, loose or broken. If you use a wooden ladder, pay attention to any rungs that may be rotten.
- Before climbing loft ladders or stepladders, check that the locking mechanism functions properly and there are no worn fixtures. Inspect the platform section on a stepladder to identify any areas that may have buckled or split.
- Whatever ladders you use, always give the feet an inspection. The chances of the ladder slipping and thus causing you to fall, increase if the feet are missing, broken or worn.
Should you spot any defects on any part of the ladder, then it's important that you don't use it, as your safety could be compromised. It usually makes more sense to replace your ladder rather than opting for spares or repairs.
Expert Inspection
As well as inspecting a ladder yourself before each use, we recommend that a detailed formal inspection by a professional should take place every three months or so.
An expert inspection can pick up defects that you wouldn't have been trained to notice yourself, and it forms an essential part of health and safety procedures, especially if ladders are used in the workplace.Inspection details carried out by an authorised expert will need to be logged for health and safety purposes. Equipment will be tagged with a ladder inspection tag, registered and dated so you know when the ladders were inspected, and when they'll need looking at again.
-
How to Stop Your Ladders Slipping
1 September 2022An accident involving a ladder can result in serious injuries, sometimes with fatal consequences.
Falls from height account for 25% of all fatal accidents in the UK each year. Annually, almost 50,000 people attend accident and emergency departments as a result of a ladder accident.BEFORE YOU TAKE A STEP, CONSIDER THE BASICS
Before you even consider setting foot upon the first rung of the ladder, conduct a risk assessment and read our ladder safety information.
The Work at Height Regulations 2005 apply to working from ladders. Section 6 of the regulations specifically set out requirements relating to ladder safety.
If the risk assessment identifies hazards which cannot be eliminated, consider using an alternative to the ladder. If the user is likely to carry loads above 10 kg up the ladder then a different method should be used.
Ways to minimise risk include checking that the ground is not wet or uneven, avoiding power lines, being aware of fragile surfaces, protecting workers from possible falling objects, inspecting equipment and ensuring the user is competent in using the ladder.CONDUCT A LADDER SAFETY INSPECTION
Before every use of a ladder, check it thoroughly to make sure it is safe to be used. Any defects must be noted and if the ladder is not safe it should be removed. Make sure the correct type of ladder is being used.
A ladder safety inspection should include the following:
- A check of the condition of the vertical stiles. If they are damaged or compromised then the ladder could collapse.
- Check that all of the rungs are secure and in good condition.
- Check the feet of the ladders. Missing or damaged feet could make the ladder unstable and worn ones could cause it to slip.
- Check all bolts, rivets and screws.
- Pay attention to any locking mechanisms and platforms.
ENSURE THE LADDER USER IS COMPETENT
Ladders are simple devices which when used correctly are very safe. Humans, on the other hand, tend not to be so simple and possess the potential to inadvertently misuse a ladder in a dangerous manner.
A working at height safety awareness course, and one that incorporates ladder safety, is the best way to ensure that workers understand the requirements of safety regulations and the law, and how to use ladders safely.HOW TO PREVENT A LADDER SLIPPING - POSITION AT A 75-DEGREE ANGLE
If the inclined angle of a ladder is too small, the base can slide out. If the angle is too large, the risk of the ladder toppling over increases.
Always adhere to the “one in four” rule when it comes to ladder safety. The base of the ladder should be placed so that it is one foot away from the building for every four feet of height. That achieves a 75-degree angle.Research has found that in 49% of ladder incidents, the angle the ladder was positioned at was 65 degrees and under.
If a ladder is positioned at an angle of less than 65 degrees, the friction required to stop it slipping needs to increase by 75%.HOW TO PREVENT A LADDER SLIPPING - STABILISE IT
The safest way to secure a ladder before you start climbing is to hook or tie the ladder to a sturdy anchor point.
Ladder hooks can secure the ladder to a fixed point such as a locating bar for wall fixing.
A ladder stability device can also be used such as the Laddermate. This simple but effective attachment significantly reduces the chance of ladder slippage.Alternatively, Ladder Stoppers have a rubber base and help prevent slips and flips. The anti-skid pad sits on the ground while a galvanised T-piece secures the ladder in place.
As a last resort, you could wedge the ladder into the ground to prevent movement or get someone to ‘foot’ the ladder by adding their weight to the base.HOW TO PREVENT A LADDER SLIPPING WHEN WORKING ON ROOFS AND GUTTERING
When working on roofs and guttering, do not rest the ladder on the gutter as this can easily give way or the ladder slip outwards. Use a standoff bracket - either a flat bar type or a tubular gutter bracket. Read our related guide Staying Safe with Roof Ladders.
A ridge hook for roofladders with a sturdy wheeled top which allows you to move the ladder along the length of the roof. The strong curved hook will securely fit over the edge of a pitched roof.LADDER SAFETY - DON'T TAKE THE RISK
We tend to think of ladders as simple pieces of equipment to be scaled up and down with ease. But the statistics on ladder accidents and injuries tell us that a serious injury from not setting up a ladder correctly is alarmingly common. Don’t become a statistic. Stop your ladder slipping.
-
How To Take Care of Your Roof Ladders
1 August 2022Roof ladders are useful for any type of work that may be carried out on a roof. Also referred to as cat ladders, they differ from standard ladders as they have a hook that attaches over the top of a roof, which secures the ladder in place. While it may seem like a chore to take care of them properly, with these quick and easy tips you can efficiently take care of your ladders for all-year round use.
THE IMPORTANCE OF SAFETY
Taking good care of your roof ladders is vital to ensure that they are safe, dependable and won't contribute to any accidents. According to Commodious, one in five fatalities in the construction industry are the result of roofing accidents.
Many of these roofing accidents occur due to incorrect use of ladders or having ladders that are not properly maintained. However, with the right level of maintenance and provided training, the risk of accidents on ladders can be massively reduced.
So, bearing these pertinent statistics in mind, here's what you need to think about to properly take care of your roof ladders.HOW TO STORE ROOF LADDERS
It's not just how you use your roof ladders that matters, but how you look after them when they're not being used is equally as important.
When it comes to storing roof ladders, it's crucial that they aren't kept anywhere that may be damp, particularly if the ladders are constructed from wood, as this may encourage them to rot.
As well as keeping them away from damp areas, roof ladders shouldn't be stored in any areas that may get very hot. In particular, fibreglass ladders shouldn't be exposed to temperatures above 93°C.
Make sure the area where the roof ladders are stored receives sufficient ventilation, so if they're kept in a garage, for instance, open the window, if there is one, from time to time to let air in.
Ladders should be stored horizontally as opposed to vertically, and to avoid sagging, provide support for the ladders at two-metre intervals.TRAVELLING WITH ROOF LADDERS
Transporting your roof ladders safely is crucial so that they don't get damaged during transit and that they remain secure. After all, a ladder falling off your vehicle roof isn't a scenario you or your fellow road users will want to encounter! You can easily attach your roof ladders to your vehicle with a suitable roof rack and clamps, so the ladders are unable to move around and won’t suffer from any damage. For a more in depth guide, see our guide to transporting your ladder safely with specialist tips and advice.
Having clamps in place also prevents your ladders from getting pinched, which could prove costly and inconvenient. It is important to not be tempted to fix ladders in place on a vehicle using ropes or a cord; these aren't secure enough. As well as this, ladders that overhang a vehicle should also be made visible to other road users, which can be done by attaching a visible marker or coloured flag to them.
PROPER MAINTENANCE OF YOUR ROOF LADDERS
Roof ladder maintenance is imperative and must be carried out regularly so that any problems can be promptly identified and fixed before you need to use them again. That said, you should always check the ladders prior to using them, as damage may have occurred during the interim.
Ensure that you give your ladders a thorough inspection, by particularly paying attention to any areas that look worn, appear damaged, loose, bent, or rotten, etc. as well as this, you should also make sure the locking mechanisms, safety clips and brackets function properly before hauling the ladder up a roof.
If you happen to spot any issues with your ladders, then it is vital that you take them out of action immediately and get them repaired or replaced, depending on the extent of the damage. Should you need to get parts replaced, contact the manufacturer for guidance and advice.CLEANING ROOF LADDERS
Many problems can be prevented from occurring by ensuring that your roof ladders are regularly cleaned and looked after. You can easily do this by removing any accumulated debris and paying particular attention to the insides of the ladder rungs which can stop parts of the ladder from suffering wear and tear, resulting in damage.
How you clean your roof ladders often depends on what material they're constructed from. For instance, a steel wool pad and soapy water can be used to clean aluminium ladders, while wood and fibreglass ladders are more suitable for cleaning with a rag or sponge and soapy water. Once your ladders are dry and in a good condition, apply a suitable wax to the side rails, contact areas and locking mechanisms, to lubricate and protect them.
USING YOUR ROOF LADDERS PROPERLY
It is important to ensure that you only use your roof ladders for their intended purpose, as well as making sure that their size and type is appropriate for the style of roof that you're working on. For example, you should be able to access the roof safely with the ladders in tow, making sure they don't get knocked when climbing onto the roof. This is because the incorrect use of ladders not only risks damaging them and the roof, but it could also be a healthy and safety hazard, putting your life in danger.
If you need to know more about how to store roof ladders or more about roof ladder maintenance, we have all the information you need on our website. Here at Ramsay Ladders, we have all of your roof ladder needs covered, with different styles and sizes fit for any roof job you have in mind. Whether you’re looking for single and double roof ladders, extensions or brackets, we have an extensive collection of high-quality and durable products for you to purchase. As well as roof ladders, we also have a selection of other ladders and also ladder accessories and equipment perfect for many types of jobs.
-
Basic Safety Tips To Consider When Using Ladders
1 June 2022Information For Your Safety
HSE's revised and simplified guidance : INDG455 'Safe use of ladders and step ladders' and INDG401 'Work at height' brief guides are now available to download from https://www.hse.gov.uk/work-at-height/index.htm.
The new guidance makes it clear, subject to risk assessment, that ladders remain a sensible and practical option in the workplace – and if it's right to use a ladder, to use the right ladder and to use it safely.
Working With Ladders
DOs DON'Ts DO place the base of the ladder on a firm, level, dry surface. If there's a time when this isn't possible - working on grass, for instance - tie the feet of the ladder to stakes in the ground to stop it slipping, and place a large flat wooden board underneath to help prevent it sinking. DON'T put a ladder on top of boxes, bricks, barrels or any other unstable surface just to gain extra height. DO position the ladder so that the base won't slip outwards. Leaning ladders are designed so that their safest angle of use comes when every 1 measure out from the wall is matched by 4 measures up it (rungs are usually about a third of a metre apart, so its easy easy enough to get the distances roughly right).Most new extension ladders now have a mark on the stiles to show the safest angle of leaning.
Remember the rule: 'ONE OUT FOR FOUR UP'
The more the base is moved out from this position, the greater the risk that it will slip outwards suddenly and fall down without warning!DON'T reach too far forwards or sideways, or stand with one foot on the ladder and the other on something else. DO secure the bottom and the upper part of the ladder, by tying them (from stiles, not rungs) with rope or straps onto a stable , fixed object. You can tie the base to stakes in the ground, or use fixed blocks or sandbags to help guard against the ladder slipping, or buy special stabilisers. A rope or strap tied from a stile onto a fixed object at about the height of the fifth rung from bottom will help to stop any further movement. If it's impossible for some reason to secure the ladder, get another adult to 'foot' it (by standing with one foot on the bottom rung and holding a stile in each hand). DON'T carry heavy items or long lengths of material up a ladder. DO rest the top of the ladder against a solid surface, never against guttering, or other narrow or plastic features. Where a surface is too brittle or weak to support the top of the ladder, use a stay or a stand-off resting on a firm surface nearby. Bolt or clip this to the top of the ladder before putting up the ladder. DON'T use a ladder in a div wind. DO have at least three rungs extending beyond a roof's edge if you're using a ladder to get yourself up onto the roof. DON'T wear sandals, slip-ons or have bare feet on a ladder. DO hold on to the ladder with one hand while you work. You can get special trays which fit between the stiles to take paint pots, tools etc. DON'T use a ladder near any power lines. Working With Stepladders
DOs DON'Ts DO rest it on a firm and level base. If you're working outside, place a large, flat board on any soft ground to make a suitable base. DO position it front-on to the work. DON'T work sideways, at any time. DO check that there are no overhead hazards near where you're going to work. DON'T have more than one person on the stepladder at a time. DO check that the stepladder is locked into its correct position. If it's a multi-way design, make sure it's is the right configuration for the job you're doing. Always follow the manufacturer's instructions. DON'T put loose tools where they could move or fall and cause an injury. Use a fixed-on work tray if necessary. DO keep both your feet on a step. Never stand on the top handrail to gain extra height. DON'T forget.. NEVER OVER-REACH DO wear flat, firm soles shoes. Never work in high heels, bare feet or slippers. DON'T hang your ladder vertically from one of its steps. DO keep a secure grip at all times. DO keep both your feet on a step. Never stand on the top handrail to gain extra height. DO keep your stepladder protected from the weather in a covered, ventilated area. DO keep it out of the way of children. -
Step Ladder vs Step Stool - Whats The Difference
1 March 2022Staying safe when using equipment that lifts you upwards is, of course, the top priority. However, choosing the right type of ladder is also very important and can also improve your productivity.
If speed is important, it can be tempting to rely largely on a simple step stool to get the job done. Whereas the stepladder has more steps and therefore a wider range of height options. Both are free-standing equipment for working at height, with a distinctive A-shape.
However, which one is best? We answer that and more questions in our ‘step by step’ guide to step ladders vs step stools.SAFETY REGULATIONS
The Health and Safety Executive provides clear guidance on using step ladders safely, as part of its work to reduce the substantial numbers of workplace injuries caused by falls.
The HSE also mandates that employers and individuals should “ensure equipment is suitable, stable and strong enough for the job, maintained and checked regularly.”
But how do you know your equipment for working at height is ‘suitable’ for the type of tasks you are doing? Should you opt for a step ladder or step stool?
Let’s explore that by looking at each type of equipment, and its advantages and disadvantages.WHAT IS A STEP STOOL?
This is generally a compact, lightweight system for creating a small amount of elevation while you work. A step stool folds out and offers one or two levels for you to stand on.
Though they are relatively simplistic, there are still important safety features to look for when buying step stools.
Firstly, does it open easily, suggesting it's new or at least well maintained? The best step stools have firm grips on their legs and a slip-proof cover on each level, as well as a top frame that helps you to gauge how far you can lean forwards.
Just like different categories of ladders, the materials used for step stools can be aluminium, wood or steel.OPTIONS FOR STEP LADDERS
Clearly, you can buy ladders that extend much further than that, but they would have 'rungs', not steps and would not be freestanding equipment.
Folding step ladders will also feature firm grips at the base of each leg, non-slip tread on the steps, and an arm on either side that clicks into place to hold the frame rigid. Some also have that additional guard rail at the top, to prevent you from leaning too far forwards.
Look for a platform step ladder, such as these Heavy Duty Platform Steps if you need one that enables you to stand at the very top level safely.
Here at Ramsay Ladders you can choose from fiberglass, timber and aluminium step ladders, all of which are strong, compliant and durable.SO, STEP LADDER OR STEP STOOL?
As the above overview shows, the main difference between these two types of equipment is height.
Folding step ladders enable you to work much higher, but still with the added assurance of a firmer foothold than ladders, and a secure supporting frame.
The rule of thumb, therefore, is that if you need to reach further than around 12 feet, a step ladder is your best option. The additional reach (and therefore versatility) of a step ladder makes it ideal for working safely on the sides of buildings, in warehouses and in agricultural settings, for example.
Step stools are ideal for indoor activities, such as for use in stock rooms, or for gaining height to carry out low-level tasks swiftly.
Browse our range of expertly designed and manufactured step ladders, and if you need further help in deciding which one is best for you, don’t hesitate to get in touch. -
What Size Roof Ladders Should I Get?
4 January 2022Ladders come in a wide variety of sizes and dimensions, each appropriate for use on different properties. Modern ladders also typically come with a range of extra features to suit particular functions. If you need to access the roof of your property, you are going to need to purchase roof ladders for the jobs you need to complete. But very often, the choice of what ladder is right for both yourself and your property is far from obvious.
THE SIZE OF LADDER FOR A ONE OR TWO STORY BUILDING
Undoubtedly, the biggest deciding factor will be the height of your home. As a rule of thumb, a 15-18ft ladder will suit a single-story building while for a two-story building, a 20-22ft ladder should do the trick. However, this is only a rough guide, and you’ll want to consider much more besides ladder height.
Naturally, a roof ladder has to be sturdy and secure if it is going to be used for an extended period on roofing jobs. Many such ladders will also have extra features such as non-slip rungs, gutter guards, and non-slip hooks, all of which make a real difference when conducting a roofing job.WORKING AT HEIGHTS: USING DIFFERENT TYPES OF LADDERS SAFELY
Despite the many things to consider when buying roof ladders for your home, the primary one will of course be height. Whether you are doing a roof job for your own home or at work, there are many safety factors that you need to consider when working from a height. Whether you are using roof ladders or extension ladders, knowing how to stop your ladders slipping when you’re using them is valuable safety information to know.
Single and double roof ladders are designed specifically to make accessing the roof a lot easier. Both types of roof ladders are fitted with wheels so that they are able to easily slide into place without causing damage to the roof. These ladders are made with strong but lightweight materials so that they are able to be moved easily while you are doing your job.Another consideration when working at heights is actually how easy it is to get on a roof to complete the job you need to do. As mentioned, there is a general rule of thumb regarding ladder height and the number of stories of your house. Nevertheless, there are times when you may wish to calculate things a little more accurately – or allow for added complexities.For one thing, many homes have multiple roofs. There can be both a high roof at the top of a home and a lower one over, say, an extension or garage. In such cases, you’ll most likely want to avoid buying two ladders, so a wide extension length is important.
For larger jobs, you might want to consider using extension ladders instead. For extension ladders, there’s a few safety things to consider for working at heights and getting up to the roof. Generally speaking, four rungs from the very top of the ladder is the highest point at which it is safe to stand. Therefore, you’ll want to make sure that your ladder clears the edge of your roof by a few feet.
But of course, no ladder is placed totally parallel with a wall. So when setting a ladder, it is important to use the 4:1 ratio rule. This rule stipulates that for every four feet in height, the base of a ladder should be placed one foot out from the wall.
Thus, a 20ft ladder would be placed five feet from the base of the wall. You can think of this also as constantly maintaining a 75-degree angle regardless of the height of the ladder. Remember also that a 20ft ladder will not, because of that angle, reach 20ft into the air.CHOOSING THE RIGHT LADDERS FOR THE JOB
After taking all the guidelines and safety information into account, you should have all you need to select the right size ladders for your property. However, beyond size, you might want to consider just what the ladder will be used for. If you expect to have jobs that will involve extended periods actually on the ladder, you’ll want to prioritise a sturdy frame and plenty of rubber grips.
If you are doing smaller jobs in the workplace and at home that don’t require working from a very high height, step ladders come in a variety of sizes and materials. But if you are working higher up from the ground, for example when needing to wash windows, window cleaning ladders would be best suited for the job.Rubber non-slip technology is essential for the rungs and the base, especially when the ladder is expected to bear the load of a person for an extended period. Ultimately, selecting the right ladder comes down to getting the right height for the task you want to do and whether your job is being done at home or professionally.
Here at Ramsay ladders, we have a wide range of high-quality, durable ladders to choose from no matter which job you aim to do with them. We even provide beneficial guides and safety information for customers to read to inform them on how to use ladders properly and safely. If you have any questions about our selection of ladders, or would like to find out more about which ladder is best for you, please get in touch with a member of our Ramsay Ladder team today. -
Our Useful Guide To Transporting Your Ladder Safely
6 October 2021The way you transport your ladder is important, particularly if you are unfamiliar with the equipment required to do it. It is essential that you secure ladders adequately to avoid accidents when driving, and there are even laws that relate to overhang.
Longer ladders, like extension ladders, are not always possible to squeeze into the back of a car/van, so you may need to transport them on the roof. There are commercial ladder handling solutions for vehicles, which help to load and unload ladders to and from a van's roof from the ground using gas-assisted mechanisms. But for those of us without these luxuries, there are more low-tech solutions that work just fine.
The most common thing to do is secure the ladder to a roof rack or roof bars. But if you are going to transport a ladder this way, you will need to be familiar with the legal requirements involved. For the UK, these are recorded under section 26 of the Vehicle and Operator Services Agency (VOSA). It is most important to stay within the restrictions for how much overhang is permitted at the front and rear of your vehicle.
Rear Overhang
If the overhand is less than 1 metre, then there are no requirements.
If the overhang is between 1 and 2 metres, you must ensure the overhang is clearly visible. Many choose to mark it with a high-vis vest or bright cloth. Whatever you choose, it must be clearly visible within a reasonable distance to other road users.
If the overhang is between 2 and 3.05 metres, you are required to have a rear marker board
If the overhang exceeds 3.05 metres, you must give notice of 2 working days to the police.
Front Overhang
If the overhang is between 0 and 2 metres, there are no requirements.
If the overhang is between 2 and 3.05 metres, you are required to have a front and side marker board.
If the overhang exceeds 3.05 metres, you are required to give the police 2 working days' notice.
Some Tips For Safe Transportation
Once you have ensured the overhang regulations have been adhered to, you will need to make sure the ladder is completely closed if it is an extension ladder. You may need to recruit some help with carrying the ladder and lifting it into position on the vehicle's roof. If you are unable to get any help, be sure that the top of the ladder is tilted upwards when you carry it.
How To Transport A Ladder Without A Roof Rack?
If you don' t have a roof rack, be sure to use pillows or cushions, or even a couple of bicycle tyres as a buffer to protect your vehicle.
How To Secure The Ladder Tight On Your Car/ Vehicle?
Lay the ladder carefully on the roof of the vehicle, either against the cushioning, roof rack or between the roof bars.
Secure the ladder at both the front and the back using ladder clamps, bungee cords, ropes or other strong ties.
It may help to take a short test drive with the ladder in a safe area, turning some sharp corners and braking abruptly to ensure the ladder is secured in place.
SHOP LADDERS -
Our Useful Safety Guide For Working With Ladders
6 October 2021Information For Your Safety
HSE's revised and simplified guidance : INDG455 'Safe use of ladders and step ladders' and INDG401 'Work at height' brief guides are now available to download from https://www.hse.gov.uk/work-at-height/index.htm.
The new guidance makes it clear, subject to risk assessment, that ladders remain a sensible and practical option in the workplace – and if it's right to use a ladder, to use the right ladder and to use it safely.
Working With Ladders
DOs
DON'Ts
DO place the base of the ladder on a firm, level, dry surface. If there's a time when this isn't possible - working on grass, for instance - tie the feet of the ladder to stakes in the ground to stop it slipping, and place a large flat wooden board underneath to help prevent it sinking.
DON'T put a ladder on top of boxes, bricks, barrels or any other unstable surface just to gain extra height.
DO position the ladder so that the base won't slip outwards. Leaning ladders are designed so that their safest angle of use comes when every 1 measure out from the wall is matched by 4 measures up it (rungs are usually about a third of a metre apart, so its easy easy enough to get the distances roughly right).
Most new extension ladders now have a mark on the stiles to show the safest angle of leaning.
Remember the rule: 'ONE OUT FOR FOUR UP'
The more the base is moved out from this position, the greater the risk that it will slip outwards suddenly and fall down without warning!
DON'T reach too far forwards or sideways, or stand with one foot on the ladder and the other on something else.
DO secure the bottom and the upper part of the ladder, by tying them (from stiles, not rungs) with rope or straps onto a stable , fixed object. You can tie the base to stakes in the ground, or use fixed blocks or sandbags to help guard against the ladder slipping, or buy special stabilisers. A rope or strap tied from a stile onto a fixed object at about the height of the fifth rung from bottom will help to stop any further movement. If it's impossible for some reason to secure the ladder, get another adult to 'foot' it (by standing with one foot on the bottom rung and holding a stile in each hand).
DON'T carry heavy items or long lengths of material up a ladder.
DO rest the top of the ladder against a solid surface, never against guttering, or other narrow or plastic features. Where a surface is too brittle or weak to support the top of the ladder, use a stay or a stand-off resting on a firm surface nearby. Bolt or clip this to the top of the ladder before putting up the ladder.
DON'T use a ladder in a div wind.
DO have at least three rungs extending beyond a roof's edge if you're using a ladder to get yourself up onto the roof.
DON'T wear sandals, slip-ons or have bare feet on a ladder.
DO hold on to the ladder with one hand while you work. You can get special trays which fit between the stiles to take paint pots, tools etc.
DON'T use a ladder near any power lines.
Working With Stepladders
DOsDON'Ts
DO rest it on a firm and level base. If you're working outside, place a large, flat board on any soft ground to make a suitable base.
DO position it front-on to the work.
DON'T work sideways, at any time.
DO check that there are no overhead hazards near where you're going to work.
DON'T have more than one person on the stepladder at a time.
DO check that the stepladder is locked into its correct position. If it's a multi-way design, make sure it's is the right configuration for the job you're doing. Always follow the manufacturer's instructions.
DON'T put loose tools where they could move or fall and cause an injury. Use a fixed-on work tray if necessary.
DO keep both your feet on a step. Never stand on the top handrail to gain extra height.
DON'T forget.. NEVER OVER-REACH
DO wear flat, firm soles shoes. Never work in high heels, bare feet or slippers.
DON'T hang your ladder vertically from one of its steps.
DO keep a secure grip at all times.
DO keep both your feet on a step. Never stand on the top handrail to gain extra height.
DO keep your stepladder protected from the weather in a covered, ventilated area.
DO keep it out of the way of children.
-
Ladder Classifications - Everything You Need to Know
7 September 2021Every portable ladder that is produced or sold in the United Kingdom or European Union will be manufactured to specific regulations. This means they meet certain criteria and will have a specific classification which explains the settings they can be used in safely. Portable ladders include all step ladders, extension ladders and platform ladders.
Any ladder that is classified as a ‘single-use’ ladder – i.e. a specialist ladder used for a very specific purpose, such as a loft ladder - is not classified using the same system, so you will only see these classifications applied to portable ladders.
Within the classification system, there are three main classes that you need to be aware of: Class 1, Class EN131 and Class III. You can use the classification of a ladder to understand the safe working load that the ladder can support, judging whether it is appropriate for the situation you wish to use it in.How are ladders classified?
Which classification a ladder falls into is defined by the level of weight it can safely hold.
Maximum Load
This is defined as the weight of a single person and any equipment that they need to carry up the ladder. This is sometimes also referred to as the ‘safe working load’.Duty Rating
Previously, ladders were defined by their ‘duty rating’ which was a value based on the expected frequency of use, and the type of environment the ladder was suitable for use in.Class 1 Ladders
Class 1 ladders are intended to be suitable for industrial applications and will have a maximum load in excess of 175kg. This is the highest possible rating in terms of the strength and quality of ladders, making them the most suitable for heavier use and industrial environments.
Class EN131 Ladders
This classification was introduced by the European Ladder Certification Standard and replaced the original Class II British Standards specification. It is a fairly wide classification, also known as BS EN131. These ladders are considered to be suitable for most commercial or light trade work – or alternatively may be a viable option for heavy-duty DIY use at home.
In 2018, new sub-categories of “EN131 Professional” and “EN131 Non-Professional” were introduced. However, as these are relatively new additions to the classification system, the product standards are not being applied retrospectively to existing EN131 ladders. This means that they are still perfectly legal and fit for use.Class III Ladders
These ladders are only suitable for use in light domestic tasks, and should not be considered as a suitable option for a commercial or a trade environment. They are generally considered to be a lightweight option, and home users who intend to use the ladder for heavier-duty tasks may still wish to consider an EN131 ladder.
How can I tell what classification a ladder is?
All ladders that are for sale online should clearly show the classification in their description. If you are shopping in a physical store, you should expect to be able to see a simple colour-coded sticker that provides an indication of what classification the ladder is.
Generally, Class 1 ladders will be marked in blue, whereas Class EN131 ladders are commonly identified by a green or yellow label. The third class, Class III ladders, can be identified by a grey label. Shops may choose to display these stickers on the accompanying labels or signage where a ladder is displayed, or they may appear on the ladder itself. If the stickers are on the ladder, it’s common for them to be placed on the rubber feet at the base of the ladder, or on any user instruction labels that are physically attached to the ladder.Sub Categories
Within the three main ladder classifications, British Standard subtypes exist. These include BS 1129:1990, which is used to indicate timber ladders (including trestles and lightweight stagings), and BS 2037:1994, which applies to metal ladders.