


Seals+Direct Ltd
Seals + Direct Ltd have been supplying their rubber seals to the marine industry for many years. They specialise in the supply and manufacture of marine, industrial and caravan seals.
-
Replacing Seals in Caravan & Motorhome Opening Windows
11 July 2023Video: Fitting Caravan & Motorhome Window Rubber Seals
This guide explains how to replace your caravan or motorhome opening window rubber. Replacing this seal is required once your existing seal starts to deteriorate or is no longer providing a sufficient seal. By fitting a new window rubber you can ensure that your caravan or motorhome is water tight and warm.
We sell a range of opening window seals suitable for most caravans and motorhomes. We also sell a range of accessories, such as cover strip fitting tools and silicone spray to help with the installation process.
Step 1a: Measuring the Wall of your Caravan or Motorhome
You will need to measure the panel (wall) thickness of your caravan or motorhome and diameter of the sealing bulb on your existing seal to determine the correct replacement seal.To measure the panel thickness, remove the existing seal and measure the thickness of the wall. This measurement should be between 25mm and 40mm. If you are not able to remove the existing seal, you can calculate the wall thickness using two pieces of wood. Place one piece of wood under the seal on the outside of the van and the other piece of wood under the seal on the inside of the van. Take a measurement from the outside of one piece of wood to the outside of the other piece of wood. You can calculate the wall thickness of the van by subtracting the thickness of the two pieces of wood from the overall measurement.
For example, if the overall measurement (A) is 77mm and wood B and wood C both measure 25mm, the wall thickness will be A (77mm) - B (25mm) - C (25mm) = 27mm.
Step 1b: Measuring the Sealing Bulb on Your Existing Seal
You will also need to measure the diameter of the sealing bulb (D) on your existing seal. This measurement should be between 10mm and 14mm.
There are two different styles of sealing bulbs on opening caravan window rubbers. The first type has a fin and the second type has a double bubble. We recommend looking at your existing seal to determine the shape of sealing bulb required.
Step 1c: Identifying the Correct Replacement Seal for Your Caravan or Motorhome
Step 2: Removing the old Caravan & Motorhome Window Rubber SealOpen your caravan or motorhome window and carefully note how the small hinge for the window stay is fitted. Take a screwdriver and undo the fixings for the two window props on the caravan so that they hang loose. The window can either be removed or propped up out of the way. Noting the way the fittings go, remove them and keep them safe with their screws.
Locate the end of the white, grey or black plastic cover strip and pull it out. Next remove all of the staples holding the rubber to the wall of the caravan. You should now be able to find the end of the rubber and carefully pull it away from the caravan.
Go around the window opening with a chisel or a flat bladed screwdriver and scrape away any sealant that was left from the window rubber. After removing as much as you can by hand use white spirit to remove the remainder. Once you have used white spirit you will then need to use Meths or Acetone to clean off the oil film left by the white spirit.
Step 3: Fitting a Caravan or Motorhome Window Rubber Seal
The new rubber comes complete with a layer of butyl mastic applied to the inside of the outside leg. Carefully push the rubber onto the wall of your caravan or motorhome.
Cut the window rubber to the correct length ensuring that the ends are fitted tightly together.
Staple the seal in place to ensure that it is held firmly onto the wall of your caravan or motorhome. These staples will be hidden by the cover strip once fitted.
Step 4: Inserting the Cover Strip into the Caravan & Motorhome Window Rubber
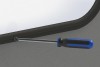
Next, fit the grey, white or black cover strip into the top of the window rubber. The easiest way to do this is with the use of a cover strip fitting tool and lubricating silicone spray. Our cover strip fittings tools (CST4335 and CST5015) and silicone spray (SS4363) are available from our website.
To use the tool, lubricate the inside of the window rubber cover strip channel with the silicone spray. Insert the tool into the channel ensuring that the two legs at the back of the tool are securely inside the channel lips.
Insert the grey, white or black cover strip through the center of the tool and push the end back into the rubber under the lips. Gently move the tool forward to lay the cover strip into the window rubber. Once you have been all the way around the window end by overlapping the end of the cover strip over where you started.
Step 5: Reassembling the Caravan & Motorhome Window Fittings
The final step is to refit all of the window fittings and stays. -
Replacing Seals in Fixed Aluminium Window Frames
11 July 2023Over time the rubber seals in your window frames will deteriorate and let in water. Whilst temporary repairs can be made using silicone sealant, the best long term solution is to replace your existing seals with new.
Step 1: Remove the Fixed Aluminium Window Frame
Start by removing all of the fixing screws from the frame. This is normally a two person job as you need one person on either side of the fixing screw.
Once all the screws have been removed, carefully remove the window frame from the aperture making sure that you do not bend it. If the frame has been bonded in place with mastic, use a flat bladed scraper and ease it around the joint until the old mastic gives way.
Using a blunt scrapper, clean up the old frame and remove all of the old sealant. Avoid using sharp scrapers or screwdrivers as these can damage the aluminium.
Step 2: Remove the Window and Existing Seal
The window frame is normally made up of several sections. At each joint remove the screws that are holding the joining strip in place. Carefully tap a thin flat scraper blade or similar tool into the joint, taking care not to damage the frame. Repeat this on each joint gradually opening up the frame until it is separated. Once you have separated each section making the frame, remove the seal and window.
If the frames are subjected to the marine environment it is advisable to soak all items in a bath of fresh water for a couple of hours. This will help loosen and dissolve any residue salt deposits. After the parts have been dried more cleaning may be required on the frame.
The next job is to check the condition of the window and seal. Most windows nowadays are made from Perspex. This is an excellent material but does deteriorate over a long period of time. If you wish to replace it, draw around it onto brown paper and send it to us for a quotation.
Step 3: Take Measurements from the Aluminium Window Frame and Glass
To determine the correct size seal you require you will need to take three measurements from the aluminium window frame and glass or Perspex.
1. Thickness of the glass / Perspex
2. Internal width of aluminium channel
3. Internal depth of aluminium channelOnce you have taken these measurements, you will need to decide whether you want to use a square U channel or wedge gasket with expanded neoprene strip.
Step 4a: Using a Square U Channel to an Aluminium Frame
To identify the best replacement square U channel to use in your aluminium frame you will need to look at our available sections and the measurements you took during the previous step.
For example, if the internal width of your aluminium channel is 6mm and your glass thickness is 3mm you can use US52. This fits into a 6mm channel and takes a 3mm thick glass.
Most of our U channels are manufactured from 70°sh EPDM rubber which will not easily compress. If you are unable to locate the exact size you require and you cannot modify one of our existing seals please contact us with your requirements. Many seals used in old windows are no longer available and modern day equivalents have to be implemented.
Step 4b: Fitting a Square U Channel into an Aluminium Frame
To fit your replacement seal measure the length around the window frame. Cut the new seal to this length leaving it slightly oversize to prevent it shrinking back over time. Apply a small bead of marine grade high modulus silicone sealant inside the rubber and place the seal around the glass / Perspex.
Now apply a small bead of silicone sealant into the bottom of the aluminium frame. Carefully place the window and seal into the frame and pull all bits together until they are in the correct position. Now replace the screws into the joining strips.
To ensure that you have a watertight window it is advisable to apply a fillet of silicone around the top edge of the seal and frame. Mask off the frame and the window leaving about a 6mm gap. Apply the silicone and then smooth it off using a blunt instrument or wet finger. Carefully remove the masking tape whilst the silicone is wet.
Step 5a: Using a Wedge Gasket in an Aluminium Frame
To identify the best replacement wedge gasket to use in your window frame look at our available sections and the measurements you took during step 3. Depending on your measurements, you can either use two wedge gaskets (one either side of the glass) or a combination of expanded neoprene and wedge gasket.
For example, if the internal width of your aluminium channel is 8mm and the thickness of your glass is 3mm, you have a gap of 5mm (2.5mm either side of the glass). You could use a wedge gasket, such as WS1580, either side of the glass. This gasket is designed to fit into a 2mm to 3mm gap.
For example, if the internal width of your aluminium channel is 7mm and the thickness of your glass is 3mm, you have a gap of 4mm. You could use a wedge gasket, such as WS1580, on one side of the glass and expanded neoprene on the other side. If using expanded neoprene strip, you will need to allow for 30% compression of this strip.
Step 5b: Fitting a Wedge Gasket into an Aluminium Frame
Place a strip of expanded neoprene into the bottom of the aluminium channel. This provides the glass / Perspex with a soft cushion. Run a small bead of marine grade silicone sealant onto the face of the expanded neoprene and assemble the frame around the glass / Perspex. Ensure that window is sitting centrally. Push the wedge gasket using your fingers or thumb into the gap either side of the window between the glass / Perspex and frame.
If you want to use expanded neoprene on one side of the window, insert a strip of expanded neoprene against the inside wall before inserting the glass / Perspex and assembling the frame.
Step 6: Refitting the Completed Window
When refitting the completed window into the boat you will require a seal to go between the frame and the cabin side. The best material to use is a closed cell expanded neoprene, about 3mm thick and slightly wider than the flange. This can be trimmed off when the window is fully fitted.
Apply this to the frame and pre drill the bolt holes. Just before fitting the window to the boat smear a small amount of silicone sealant onto the top face of the seal. This will accommodate any minor imperfections and stop any leaks. Fit the screws and tighten up to achieve a 30% compression on the seal. Carefully trim the expanded neoprene around the edge of the frame using a sharp knife, and wipe away any excess sealant.
-
Replacing Seals in Sliding Aluminium Window Frames
11 July 2023The rubber seals in your sliding windows will eventually wear and deteriorate. Sliding windows on boats, old caravans and some other vehicles often have sliding windows in Aluminium frames. Historically, these windows used either a felt or webbing material to allow the window to slide within the channel. These seals have been replaced with a flock (velvet) covered rubber or polyester ribbon which is more hard wearing. There are two main types: a preformed ‘U’ shape or a flat strip that bends to fit inside a channel.
Step 1: Remove the Sliding Aluminium Window FrameRemove all of the fixing screws from the aluminium frame. It is useful to have an extra pair of hands when doing this as you will need one person either side of the fixing screw.
Once you have removed all of the screws, remove the window frame from the aperture making sure that it is kept flat to avoid bending. If the frame was previously bonded in place with mastic, use a blunt scraper to ease the frame away.
Clean up the old frame using a blunt scrapper removing all of the old sealant and mastic. It is best to avoid using screwdrivers and other sharp tools as these may damage the aluminium window frame.
Step 2: Remove the Window and Existing Seal
Your window frame will probably be made up of several different parts. Remove the screws that are holding each piece together. Once the screws have been removed, carefully tap a thin scraper into the joint. Taking care not to damage the frame, repeat this process on each joint until the frame is separated. Once you have dismantled the frame remove the old sliding window seal and glass.
For windows which are subjected to the marine environment we recommend that you soak all items in a bath of fresh water for a couple of hours to help loosen and dissolve any residue salt deposits.
If the condition of the window has deteriorated or it has broken, we recommend sourcing new glass or Perspex. A lot of windows are now made from Perspex. Whilst this is a good material for some windows, it can deteriorate and discolour over a long period of time. If you wish to replace your window with Perspex, please draw around your existing window pane onto brown/plain paper and send it to us for a quotation.
Step 3: Take Measurements from the Aluminium Window Frame and Glass
You will need to take three measurements from the aluminium window frame and window pane to determine the best replacement seal.
1. The thickness of the window pane (ie, the glass / Perspex)
2. The internal width of aluminium channel
3. The internal depth of aluminium channelOnce you have taken these measurements, you will need to decide whether you want to use a flocked lined seal preformed into a U shape, or a flat strip that you can bend to fit inside a channel.
Step 4a: Using a Flocked Channel in a Sliding Aluminium Frame
To identify the best replacement seal to use with your sliding aluminium window you will need to look at our available sections and your measurements.
In most instances you will be able to use U shaped flocked channel. For example, if the internal width of your aluminium channel is 12mm and the thickness of your glass is 4mm you can use FWR148. This seal fits into a 12mm x 12mm channel and takes a 4mm to 5mm thick glass.
If you are not able to find a U shaped flocked channel, you will need to consider using either a flocked lined strip or polyester strip. When deciding on which sliding window strip to purchase, ensure that there is enough space within the channel to allow for the glass and thickness of the strip either side of the glass.
Step 4b: Fitting a Flocked Channel into a Aluminium Window Frame
To fit your replacement seal measure the length around the window frame. Cut the new seal to this length leaving it slightly oversize to prevent it shrinking back over time. Apply a small bead of marine grade silicone sealant inside the aluminium channel and insert the rubber seal into the frame.
Carefully place the glass into the frame and position all bits together until they are in the correct location. Now replace the screws into the joining strips.
Step 5: Refitting the Completed Window
When refitting the completed window we recommend inserting a sponge seal between the aluminium frame and cabin side. Our adhesive backed closed cell expanded neoprene does not absorb water and can be used for this purpose. We recommend using a strip around 3mm thick and slightly wider than the flange. Any excess can be trimmed off when the window is fully fitted.
Peel off the release tape to reveal the sticky backing and stick the strip to the frame. Pre drill the bolt holes and then smear a small amount of silicone sealant onto the top face of the seal. This will accommodate any minor imperfections and stop any leaks. Fit the screws and tighten up to achieve a 30% compression on the seal. Carefully trim the expanded neoprene around the edge of the frame using a sharp knife, and wipe away any excess sealant.
-
Window Seal Types
11 July 2023Boats, caravans, motorhomes and other vehicles use a range of rubber seals on their windows. Over time these seals begin to perish and need to be replaced to help stop water ingress and damage. The replacement seals you require will depend on the type of seal that is currently fitted to your boat or vehicle. This guide shows the most common types of window gaskets.
Some manufactures have historically used bespoke rubber seals on their boats, caravans, motorhomes or vehicles. These window seals may be different to what is shown below. Please get in touch if you are not able to identify a replacement for your current window section. We are happy to help identify an alternative product which may be suitable for your application. We will need to see the end profile of your current seal together with several dimensions. You can either send us a sample of your current section via post or a sketch or photograph by email.
Type 1: Claytonrite Window Seals
Claytonrite window rubbers are often used in fixed windows on boats and van conversions. They are also commonly used in machine guards and viewing windows in cabinets. These seals are available in a range of sizes depending on the thickness of the panel (ie fibreglass, aluminium etc) and the glass or Perspex.
There are three important dimensions; Gap A, Gap B and the Web thickness. Gap A and Gap B relate to the glass and panel thicknesses. These gaps are interchangeable so the glass and panel can go into either Gap A or Gap B. These glazing rubbers will seal approximately -1mm so you can fit a 2mm to 3mm thick panel into a 3mm gap. The thickness of the Web relates to the thickness of the solid piece of rubber between the two gaps. This stipulates how much smaller your glass should be in relation to the size of the hole (ie window aperture).
Claytonrite window gaskets need a filler strip (also known as beading or locking strip) to hold the seal in place and apply compression onto the panel and glass. Filler strips are available in black, chrome or white for most of our Claytonrite window rubbers. It is also recommended that you bed the rubber in with a high quality clear silicone sealant to fill any imperfections.
Type 2: Caravan and Motorhome Opening Window Seals
Caravans and motorhomes commonly have hinged opening windows. These seals are available in a range of sizes to fit most caravans and motorhomes. They are manufactured from solid rubber with a sponge rubber sealing bulb which compresses against the window and creates a watertight seal.
Our ‘How Do I Replace a Caravan or Motorhome Opening Window Rubber Seal?’ guide explains the process of measuring and identifying the correct size replacement seal.
There is a slot in the top of these window rubbers which takes a cover strip (also known as insert strip) which covers the staples holding the seal onto the wall of your van. This strip is available in grey, white or black.
Type 3: Aluminium Frame Window Seals
Aluminium frames are commonly used on boats and some older caravans and motorhomes. The type of seal you require will depend on whether your aluminium frame is fixed or sliding.
Fixed aluminium window frames require either a square U channel or wedge gasket. Our ‘How Do I Replace the Seal in a Fixed Aluminium Window Frame?’ guide explains the process of measuring and identifying seals for these windows.
Sliding aluminium window frames should be fitted with a flocked seal. These seals are covered in a velvet material which allows the window to slide within the channel. Our ‘How Do I Replace the Seal in a Sliding Aluminium Window Frame?’ guide explains the process of measuring and identifying seals for these windows.
You will need to bed both the glass and rubber gasket into the aluminium channel with a high quality silicone sealant.
Type 4: Compression Window Seals
Compression seals can be used when you have an overlapping window (ie the Perspex is bigger than the hole). A rubber sealing strip is compressed between the cabin side and window to create a watertight seal.
The best material to create a compression seal is either plain or adhesive backed expanded neoprene. This is available in strip or sheet form, depending on whether you require linear lengths or a large sheet to cut custom sized gaskets. As this is a sponge material, it is advisable to make pilot holes in the seal for the screws. This will help prevent the seal from being damaged when the screws are inserted and tightened.
We recommend that you smear clear silicone onto both faces of the seal. This will help reduce imperfections in the cabin side and keep the gasket in place. You should also cover the screw in silicone prior to fixing the Perspex onto the cabin to reduce the chance of water ingress in these areas.
Type 5: S Shaped Window Seals
S shaped window rubbers are used on small windows where the glass or Perspex is larger than the aperture. These seals do not need a filler strip so should only be used on small windows, cabinets and inspection hatches.
In a similar way to Claytonrite window seals, these sections have two important dimensions; Gap A and Gap B. Gap A and Gap B correspond to the glass and panel thickness and are interchangeable. These window seals will seal approximately -1mm so you can fit a 2mm to 3mm thick panel into a 3mm gap.
If you have a large window or heavy glass pane, you should use an S shaped Claytonrite window gasket with filler strip.
Type 6: S Shaped Claytonrite Window Seals
S shaped Claytonrite window seals are designed to be used on windows where the glass or Perspex overlaps the window aperture.
These overlapping Claytonrite seals have two important dimensions (Gap A and Gap B) which correspond to the glass and panel thickness. Your glass or panel thickness may be slightly different to the dimensions displayed on our seals. However, these gaskets will seal approximately -1mm so you can fit a 4mm to 5mm panel into a 5mm gap.
Unlike smaller S shaped seals, these window gaskets require a filler strip (also known as locking strip or beading). This filler strip applies compression against the glass and panel and helps keep the section firmly in place. Filler strips for these sections are available in black, chrome or white. When fitting the seal we advise that you bed the rubber in with a high quality clear silicone sealant to fill any imperfections.
-
Fitting Fenders
11 July 2023Our fenders are ideal for protecting your boat, pontoon or other marine vessel from bumps or knocks in the event of impact. Our fenders can also be used in industrial settings, such as docking bays and factories, where you need a level of impact protection. All of our fenders are designed for DIY installation.
We manufacture our fenders from marine quality EPDM rubber or PVC depending on whether you require a non-marking material or rubber which will stay the same hardness all year round. We also supply a range of Aluminium fenders.
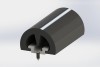
Type 1: Fitting D Fenders
D fenders are easy to fit by feeding a fixing bar through the centre of the hollow ‘D’ and securing in place.
Start by feeding the fixing bar through the centre of the ‘D’. Line up the fender with the side of the boat and with a lubricated drill bit, drill through the top face of the ‘D’, fixing strip and gunnel. Using self-tapping screws or bolts fasten the fender to the boat every 150mm to 200mm.
You should use a plugging cord (black or white) to plug the drill holes. Cut the plugging cord long enough to touch the screw / bolt heads and secure in place with a Polyurethane adhesive. Once the adhesive has set, trim the plug so that it is flush with the top of the fender.
View our range of EPDM D Fenders and PVC D Fenders.
Type 2: Fitting U FendersU fenders are available in a range of sizes. They normally locate onto a flange protruding from the side of the boat.
PVC fenders, whilst non-marking, are often slightly harder than the rubber equivalent. We recommend that you soften PVC fenders in hot water to make the section more flexible and easier to work with.
To fit, push the fender over the flange or edge and fasten in place by using self-tapping screws or rivets through the underneath.
View our range of EPDM U Fenders and PVC U Fenders.
Type 3: Fitting Rigid PVC and Aluminium Fenders
Our rigid PVC and aluminium fenders are available in a range of sizes and colours. Aluminium fenders are etched, polished and anodised so is often used on motorboats and yachts where you are looking for an attractive boat fendering solution.
With the end approximately 1.8 metres below the bow, line up the fender with the gunnel. Drill and secure with self-tapping screws or rivets every 225mm to 300mm. Pull the fender around the bow fastening as you go. Butt up the next length and fasten in place.
For tight bends it is advisable to put some wire in the corners of the internal grooves to prevent the fender collapsing and hindering the fitting of the insert.
View our range of Rigid PVC Fenders and Aluminium Fenders.
Type 4: Fitting Easy Fit D Fenders
Our Easy Fit ‘D’ fenders are designed for DIY installation and are available in a range of sizes and colours. These fenders have hidden fixings so offer an attractive boat fendering solution.
Start by drilling holes through the easy fit fender track and then secure it against the side of the boat with self-tapping screws. Locate one edge of the fender over one ledge of the track and then stretch the other edge of the fender over the other ledge of the track.
View our range of Easy Fit ‘D’ Fenders.
-
Locker and Hatch Seals
11 July 2023Lockers and hatches, commonly found on boats and caravans, require a seal to prevent water ingress. There are many different types so you should considering the following factors when choosing a sealing solution:
Trueness: When the lid is closed, there should be an even gap all the way around the hatch so that there is an even compression on the seal.
Surface: The type of sealing surface such as knife edge or flat surface will influence the style of sealing solution you can use. Sponge seals and rubber extrusions can be bonded onto flat surfaces, but clip on edge trims will be required for lockers and hatches with flanges or edges.
Compression: You should aim to compress your chosen seal by approximately 30%. This helps provide a watertight seal whilst preventing compression set or damage. It may be necessarily to fabricate ‘stops’ around the edge of the hatch to ensure that the lid does not compress the section by more than 30% when closed.
Weight: The weight of the hatch and the number of fixings holding down the hatch will influence the size of seal required. Heavy hatches and those with a large number of fixings should be fitted with larger seals to reduce the risk of damaging the seal when under compression.
Type 1: Sponge Seals
Sponge seals can be used on lockers and hatches which have flat surfaces. These sections would need to be bonded onto the surface with a high quality adhesive if no pre-supplied adhesive backing is present on the seal.
Our sponge seals are manufactured from a closed cell sponge so do not absorb water. They are available as rectangular strips or different shapes and sizes. Depending on the force of compression, you may decide on using a sponge strip or section with hollow centre. Sponge sections with hollow centres require significantly less compression than ‘solid’ alternatives.
We advise against compressing sponge seals by more than 30% so suggest that ‘stops’ are fabricated around the edge of the hatch to ensure that the seal is not under too much compression. Sponge seals under pro-longed and excessive compression will result in compression set.
View our range of Sponge Seals.
Type 2: Rubber Extrusions
Rubber extrusions are manufactured from a solid rubber, similar to the hardness of a car tyre. As these profiles are harder than sponge alternatives, they are suitable for heavier hatches with larger closing forces. They will need to be bonded onto a flat edge using a high quality waterproof contact adhesive.
‘P’ sections or tadpole sections are commonly used on hatches. These rubber sections have a hollow centre to aid compression when the hatch is closed.
View our range of P Sections and Tadpole Sections.
Type 3: Interlocking Rubber Extrusions
It is possible to interlock two rubber extrusions by attaching one section onto the base and one section onto the lid. Interlocking sections are recommended when you need to significantly reduce the change of water ingress.
The most popular solution is a rubber P section interlocking into the middle of a rubber B section.
These rubber extrusions will also need to be bonded onto a flat edge using a high quality waterproof contact adhesive.
Type 4: Clip on Edge Trims
Clip on edge trims are commonly used as seals on boat hatches. They can also be used on doors, lockers, enclosures and cabinets. These sections consist of a metal reinforced clip on edge trim with sponge sealing bulb on the top or side. They are available in a range of sizes depending on the thickness of the panel they will be fitted onto and required size of sponge sealing bulb.
These sections should be fitted onto an edge so that bulb is compressed when the lid is closed. We recommend that the sponge sealing bulb is only compressed by approximately 30%. This is to ensure that excessive compression does not damage the seal and cause compression set. For example, if you have a gap of 10mm, we recommend using an edge trim with a bulb diameter of around 14mm.
View our Edge Trims With Side Seals and Edge Trims With Top Seals.
-
Replacing Claytonrite Window Seals
11 July 2023Over time the seals holding the Perspex or glass in your boat, car, van or caravan may shrink, perish and become less effective so need to be replaced to prevent water ingress and damage. This guide details how to take measurements to identify the best replacement seal and then the steps required to fit it into your boat or van.
Step 1: Remove the Filler Strip
Claytonrite window seals contain a filler strip which applies compression onto the panel and glass to hold the seal firmly in place. This filler strip needs to be removed before you can remove the actual window rubber and glass.
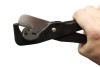
Locate the end of the filler strip and insert the glazing tool into the joint. Hook the end of the filler strip and pull it out all the way around the seal.
Step 2: Remove the Window
The next step is to remove the window pane. Insert the glazing tool into the top middle face of the seal and hook it around the back of the window. Gently lever the window forwards until it separates from the rubber. You may need to insert the glazing tool and lever forwards at several different points around the rubber seal.
Once the glass or Perspex has been removed, you can remove the existing seal.
Step 3: Measure the Glass, Panel and Web Thickness
Claytonrite window seals are sold in a range of sizes depending on the thickness of the wall and glass / Perspex. Measure the thickness of these using a Vernier or tape measure. It is important to be very precise with your measurements as the difference between two seals can be as little as one millimetre.
You will also need to calculate the web thickness. The web is the difference in size between the glass and aperture / hole. To take this measurement, measure the width of the glass and the width of the aperture and then deduct one from the other. For example, if the glass measures 1000mm and the aperture measures 1016mm, you will have a gap of 8mm on the left of the window and 8mm on the right of the window. You should therefore look for a replacement seal with a web around 6mm to 8mm. Take these measurements at several points around the window to ensure there is an even gap all the way around.
Finally, measure around the window and calculate how many metres you need to purchase. It is best to purchase slightly more than you require as you will need to cut the seal over length during fitting. This is to enable a tight compression fit.
Step 4: Identifying the Correct Replacement Claytonrite Seal
Step 5: Fitting the Replacement Claytonrite Seal
After purchasing the correct replacement window rubber and filler strip you can start fitting the new seal.
If you are fitting more than one window, cut your seal to length ensuring that it is slightly longer than required.
Fit the window rubber to the panel ensuring that you choose the correct orientation of the rubber seal if the panel thickness is different to the window thickness. The filler strip groove should be on the outside. Start at the middle of the top of the window aperture and work your way around pushing the seal tightly against the panel edge especially in the corners. Once you have been all the way around the window aperture and are back where you started, cut the seal to length ensuring it is slightly over length. Push the final end in place ensuring it is a very tight fit.
Step 6: Fitting the Window Into the Claytonrite Window Rubber
Squirt a small amount of diluted washing up liquid into the groove of the window rubber which holds the glass. This will lubricate the rubber and make the window easier to fit. Take the glass and insert it into the bottom groove of the window rubber. Using the glazing tool lever the glass into the window rubber groove all the way around.
Step 7: Fitting the Filler Strip Into the Claytonrite Window Rubber
Once you have fitted the window into the window rubber, it is time to fit the filler strip. Before doing this, pour a small amount of washing up liquid into the filler strip channel in the window rubber.
Starting at the middle of the bottom, insert the glazing tool into the groove and place the filler strip into the loop of the tool. Run the tool around the groove following the length of filler strip. This should now be placing the filler strip into the groove. Once you have fitted the filler strip all the way around, trim off any excess making sure that it is slightly longer and then push the final end in.
-
Adapting Claytonrite Window Rubbers For Different Thicknesses
11 July 2023Claytonrite window rubbers are designed to hold the glass or Perspex in your boat, car, van or caravan. Over time these seals may have shrunk, perished or deteriorated so should be replaced to prevent water damage to your boat or van.
Whilst our range of Claytonrite window rubbers cover the majority of different panel and glass thicknesses, there are instances where you need to use a window rubber which is not a perfect fit for your vehicle. Without adaption, these seals may not create a sufficient seal and can cause issues with water ingress. This guide details how to take measurements to identify the best replacement seal and then the steps required adapt the window rubber using solid neoprene, if required.
If the thickness of your panel is 8mm thick and the thickness of your glass is 5mm think, you may decide to use WR69. This section has a 10mm gap and a 5mm gap. Whilst we normally advise that our glazing rubbers seal approximately -1mm, inserting an 8mm panel into a 10mm gap is not recommended. You can adapt this Claytonrite window rubber by using strips of 1.5mm thick solid neoprene rubber strip. This would increase the thickness of your panel to 9.5mm (8mm wall and 1.5mm rubber strip) which would be almost perfect for the 10mm gap in the window rubber.
You should insert a piece of solid neoprene once you have fitted the window into the window rubber but before you fit the filler strip. To do this, slide a piece of solid neoprene into the gap between the glass or panel and rubber. This should be done on the inside of the boat or van. Fit the filler strip and then use a sharp knife to carefully cut off any excess rubber.
Take a look at our ‘Replacing Claytonrite Window Seals’ technical help guide for instructions of how to fit a standard Claytonrite window rubber.
-
Measuring The Gap For Wedge Gaskets
11 July 2023Wedge gaskets apply compression against the glass to hold the window firmly in place. They are designed to be inserted between the glass and frame and are commonly found in double glazed units in residential and commercial buildings. They can also be used in Aluminium window frames where it is not possible to use a square U channel due to tight bend radiuses.
Replacement wedge gaskets can be identified by the size of the gap that they will push into. For example, our WS2268 is designed for a 3mm gap. To identify the best replacement you will need to measure the gap where the seal will be fitted (ie, the gap between the glass and frame).
There are several different ways of taking this measurement. The first option is to remove the existing wedge gasket from one side of the window frame. Using a ruler you can then measure the gap between the glass and frame. Whilst this is normally very accurate, you should ensure that your ruler does not have space before the start of the first measurement as this will give you an inaccurate reading.
If you are able to disassemble your window frame, you may find it easier to measure the internal width of the channel and thickness of the glass. Once you have these to measurements, you can calculate the size of the gap either side of the glass between the glass and frame. For example, if the internal width of your channel measures 10mm and the thickness of your glass is 4mm there is a 3mm gap either side of the glass.
We offer four standard sizes of wedge gaskets which should fit the majority of window frames. All of these seals can be purchased by the metre.
WS1580 To Fit a 2mm to 3mm Gap VIEW PRODUCT WS2268 To Fit a 3mm Gap VIEW PRODUCT WS2269 To Fit a 4mm Gap VIEW PRODUCT WS2270 To Fit a 5mm Gap VIEW PRODUCT Depending on the size of the channel and thickness of your glass, you may only have space for one wedge gasket on one side of the window. The other side of the glass can be cushioned against the side of the frame using a piece of sponge expanded neoprene.
Once you have purchased a replacement wedge gasket, fitting the seal into your frame is a relatively easy process. Remove the existing seal and simply push the new gasket into the gap either side of the window using your fingers. If you are refurbishing the entire aluminium window frame, we recommend resting the glass on a piece of expanded neoprene. This process is detailed in our ‘Replacing Seals in Fixed Aluminium Frames’ guide.
-
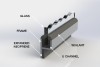
Fitting Watertight Door and Hatch Seals
11 July 2023Large ships and marine vessels such as oil tankers and cruise liners are fitted with watertight doors, hatches and skylights which are used to isolate sections of the ship in the event of flooding, fire and smoke. These doors are often fitted with multiple latching points so need a heavy duty and long lasting seal to stop water ingress.
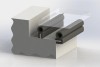
Watertight door and hatch seals are manufactured with a sponge core bonded to a solid rubber outer skin. This outer shell helps strengthen the seal when closed whilst the internal sponge allows for easy compression. This combination creates a long lasting, heavy duty seal which helps maintain a reliable watertight environment. These seals are manufactured with two chamfered corners to allow the seal to security fit into the channel to allow for the weld fillets.
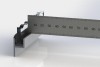
These seals are fitted into a metal channel attached to either the door / hatch or surrounding frame. This channel is typically manufactured by welding sheets of metal together to form a ‘U’ shape. The seal should be bonded into the channel using a suitable adhesive, such as a Polyurethane or contact adhesive. If using a contact adhesive, you should only apply the adhesive to the bottom of the channel to prevent the seal from sticking on the sides during installation.
The opposing face should be fitted with a round ended blade which will insert into the seal as the door / hatch closes. Typical compression of the seal should be between 3mm and 5mm although this can be varied by experimentation should the need arise. Take care not to over compress the seal as this will cause compression set damaging the recovery of the seal.
-
How To Provide Details of Your Seal
11 July 2023If you need help identifying a seal in our range that meets your requirements, the easiest way for us to assist you is to either send us a sample in the post or email us a photograph of the end profile of your existing seal.
As most seals look very similar from the side, we recommend that you follow the guidance below when sending us a sample or photograph. This will enable us to support you and find a suitable product for your sealing problem.
Send Us a Sample in the PostThe best way to identify a suitable replacement is to cut off a small slither of your existing seal and send it to us by post. This allows us to look in detail at your existing seal by establishing the material, hardness and taking measurements of the key areas.
Please ensure that any samples posted to us for identification are correctly stamped and comply with Royal Mails weight and thickness requirements. Under stamped parcels often get held at the post office or returned to sender resulting in a delay in your seal reaching us.
Please take a look at the Royal Mails website for guidance on sending parcels.
Email Us a Photograph
If you do not want to cut your existing seal, we can still help you identify a replacement. We will need to see a clear photograph of the end profile of your existing seal. If your current seal is still fitted, you will need to locate the end and carefully release a couple of inches. This will allow you to take a photograph of the end profile, revealing its shape and any other identifying features. Unfortunately, photographs of the side profile do not show us enough information.
Please ensure that your photographs are focused on the end profile of the seal and not the background.
It is often helpful if you can take the photograph of the seal against a measuring device such as a tape measure or ruler. If you are not able to do this, providing a couple of basic dimensions in your email will also help us identify a replacement. Ensure that the measuring device is correctly aligned with the seal in the photograph so that we can clearly see the overall dimensions.
Please email us your photographs using our contact form.